From the first applicant to an eligible driver
This tutorial takes one applicant through the whole path Ochema covers today: a new company publishes a job, a driver applies on a phone, gets a text message, books an interview, accepts an offer, fills and signs the full application, is hired, and the driver file is completed until the driver is Eligible to drive. It ends with the audit export of the driver file.
The example company is Bluebonnet Logistics, a carrier in Dallas, Texas, with interstate operation and CDL drivers. The owner is Olivia Owner. The applicant is Maria Lopez, who applies for Regional Reefer Driver from her phone. Use your own company, job and a real applicant, or a colleague playing the applicant with a phone.
You work in two places:
- the office system, signed in as the owner of the company;
- the phone of the applicant, who opens the public pages: the job, the scheduling page, the signing page and the full application.
Before you start
Section titled “Before you start”- About an hour.
- An email address for the owner account and one for a teammate to invite.
- Your USDOT number and your company address.
- A phone for the applicant, with a US mobile number and an email address.
- An SMS number for your company, which only Ochema support assigns: ask for it when you create the company. Without it, you can follow the tutorial with email alone, as section 2 explains.
- Emails that reach real inboxes: in Platform > Integrations, tab Messaging, the Email card shows a Provider other than Simulator. The provider is chosen by the Ochema team, so if it shows Simulator, ask Ochema support. Send test email on that card sends one email to your own address to check it. See Messaging settings.
- A PDF file of each screening result you receive (motor vehicle record, PSP report, medical exam, road test).
1. Set up the company
Section titled “1. Set up the company”- On ochema.app, select Start free. On Create your company, fill in Company name, Company time zone, Full name, Email and Password, and select Create company. Home opens with the Getting started list. See Create your account.
- In Getting started, select Open company details. Fill in Street address, City, State, ZIP code and USDOT number. Under Type of operation, choose Interstate and With a CDL. Select Save changes. See Company details.
- Back on Home, select Open careers page. Type the Address of your careers page and select Save changes. See Your careers page.
- Back on Home, select Create a job. Type the Title
Regional Reefer Driver, choose Status Open, Driver type CDL A, Equipment Reefer, Route type Regional, and a Minimum pay of0.62and Maximum pay of0.70per mile. Leave Publish on the careers page on and select Create job. On the page of the job, select Copy link: this is the link of the job you give the applicant. See Publish your first job. - Back on Home, select Invite people, then Invite user. Type the Email of a teammate, choose a Role and select Send invitation. See Invite your team.
When the four steps are done, the Getting started list leaves Home.
Open the screenshot at full size in a new tab: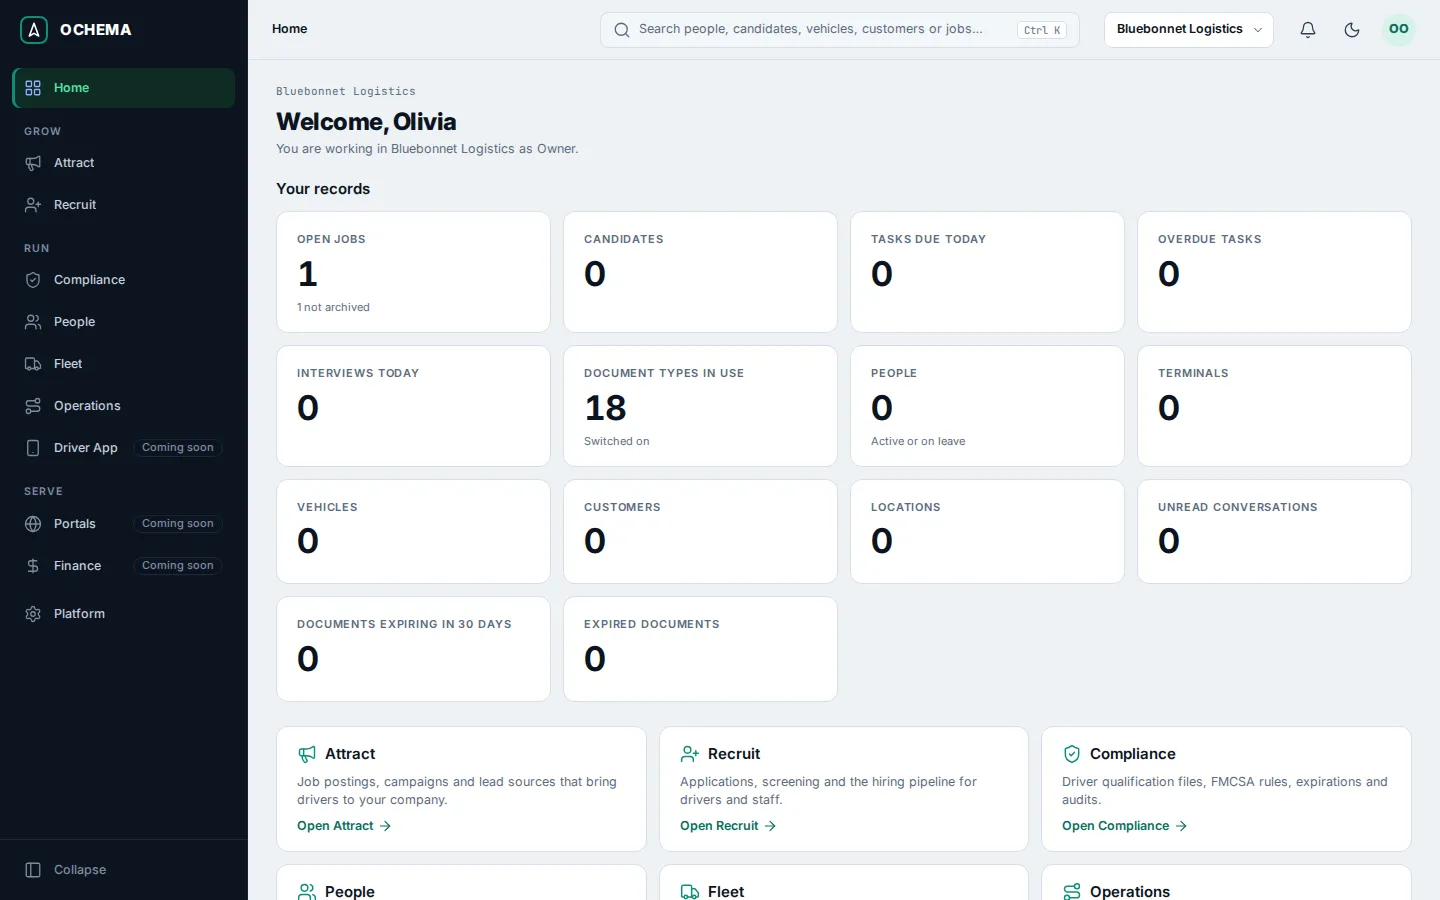
2. Turn on the first text message
Section titled “2. Turn on the first text message”Ochema answers every new applicant with a text message, by the automation rule First response. A new company has it turned off.
-
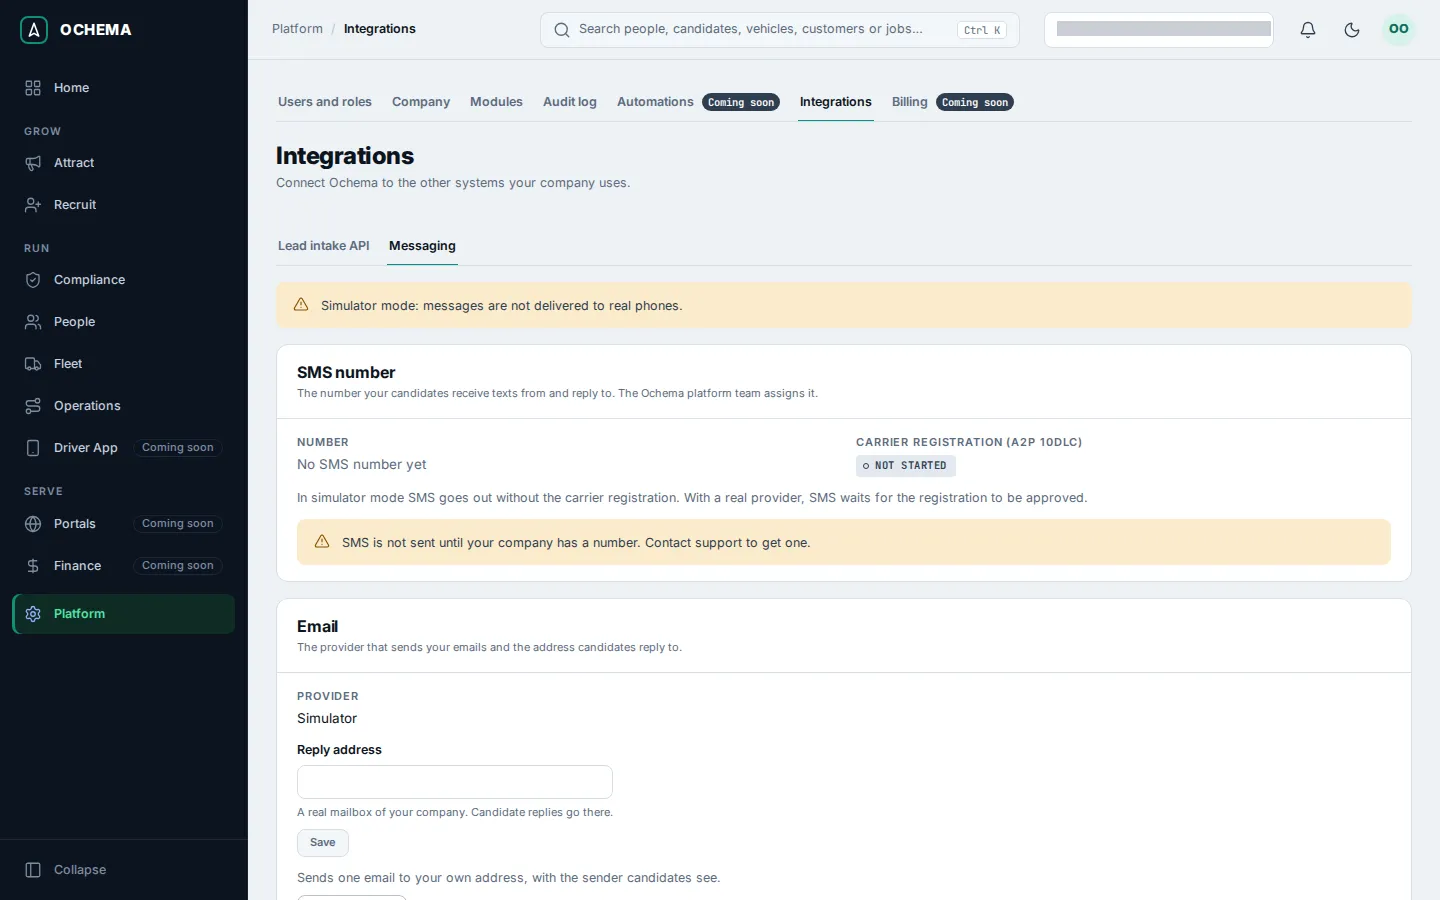
Open Platform in the menu on the left, then Integrations, then the Messaging tab. Look at the SMS number card:
- Number shows the number of your company and Carrier registration (A2P 10DLC) shows Approved: text messages can go out. Go on with step 2.
- Number shows No SMS number yet, with SMS is not sent until your company has a number. Contact support to get one.: your company cannot set the number itself. Ask Ochema support for it. While you wait, do steps 2 and 3 anyway, and follow the rest of the tutorial by email: the rule First response sends nothing, so the applicant gets no first text message (section 3), and the page of the candidate shows First SMS not sent (section 4, steps 1 and 2). In section 4, step 7, and in section 9, choose Email under Send by.
-
Open Recruit, then Automations. In Automation rules, select First response.
-
Select Turn on. The message First response is on. appears, and the button changes to Turn off.
Open the screenshot at full size in a new tab: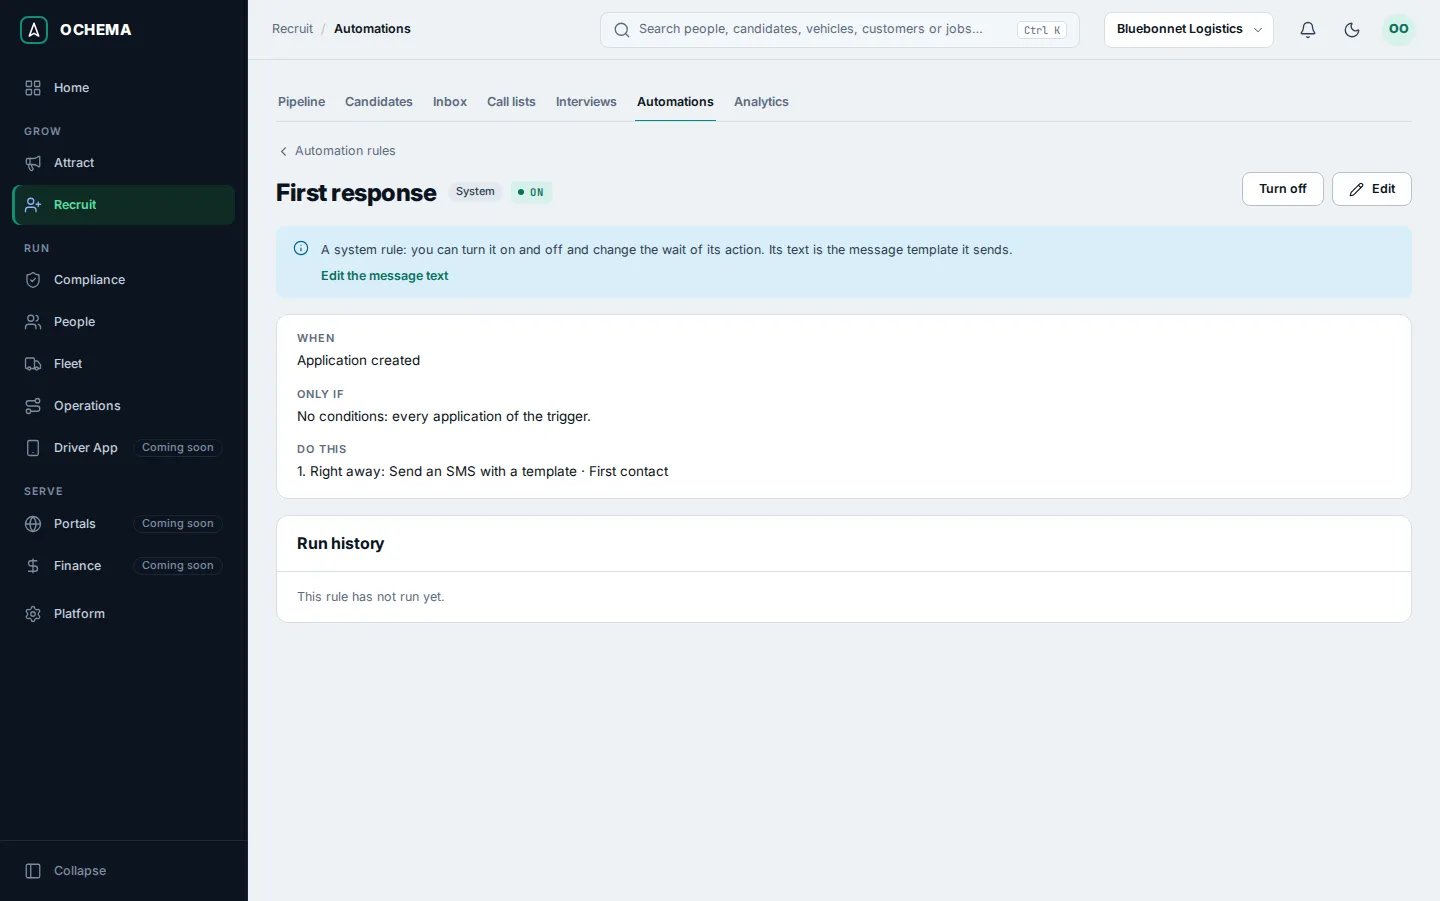
Automatic messages go out only inside the sending hours of the company (by default 8:00 AM to 9:00 PM, in the time zone of the applicant). To answer an applicant who applies at night at once, go back to Platform > Integrations, tab Messaging, and under Sending hours turn on Send the first message at any hour. The message Messaging settings saved. appears.
Open the screenshot at full size in a new tab: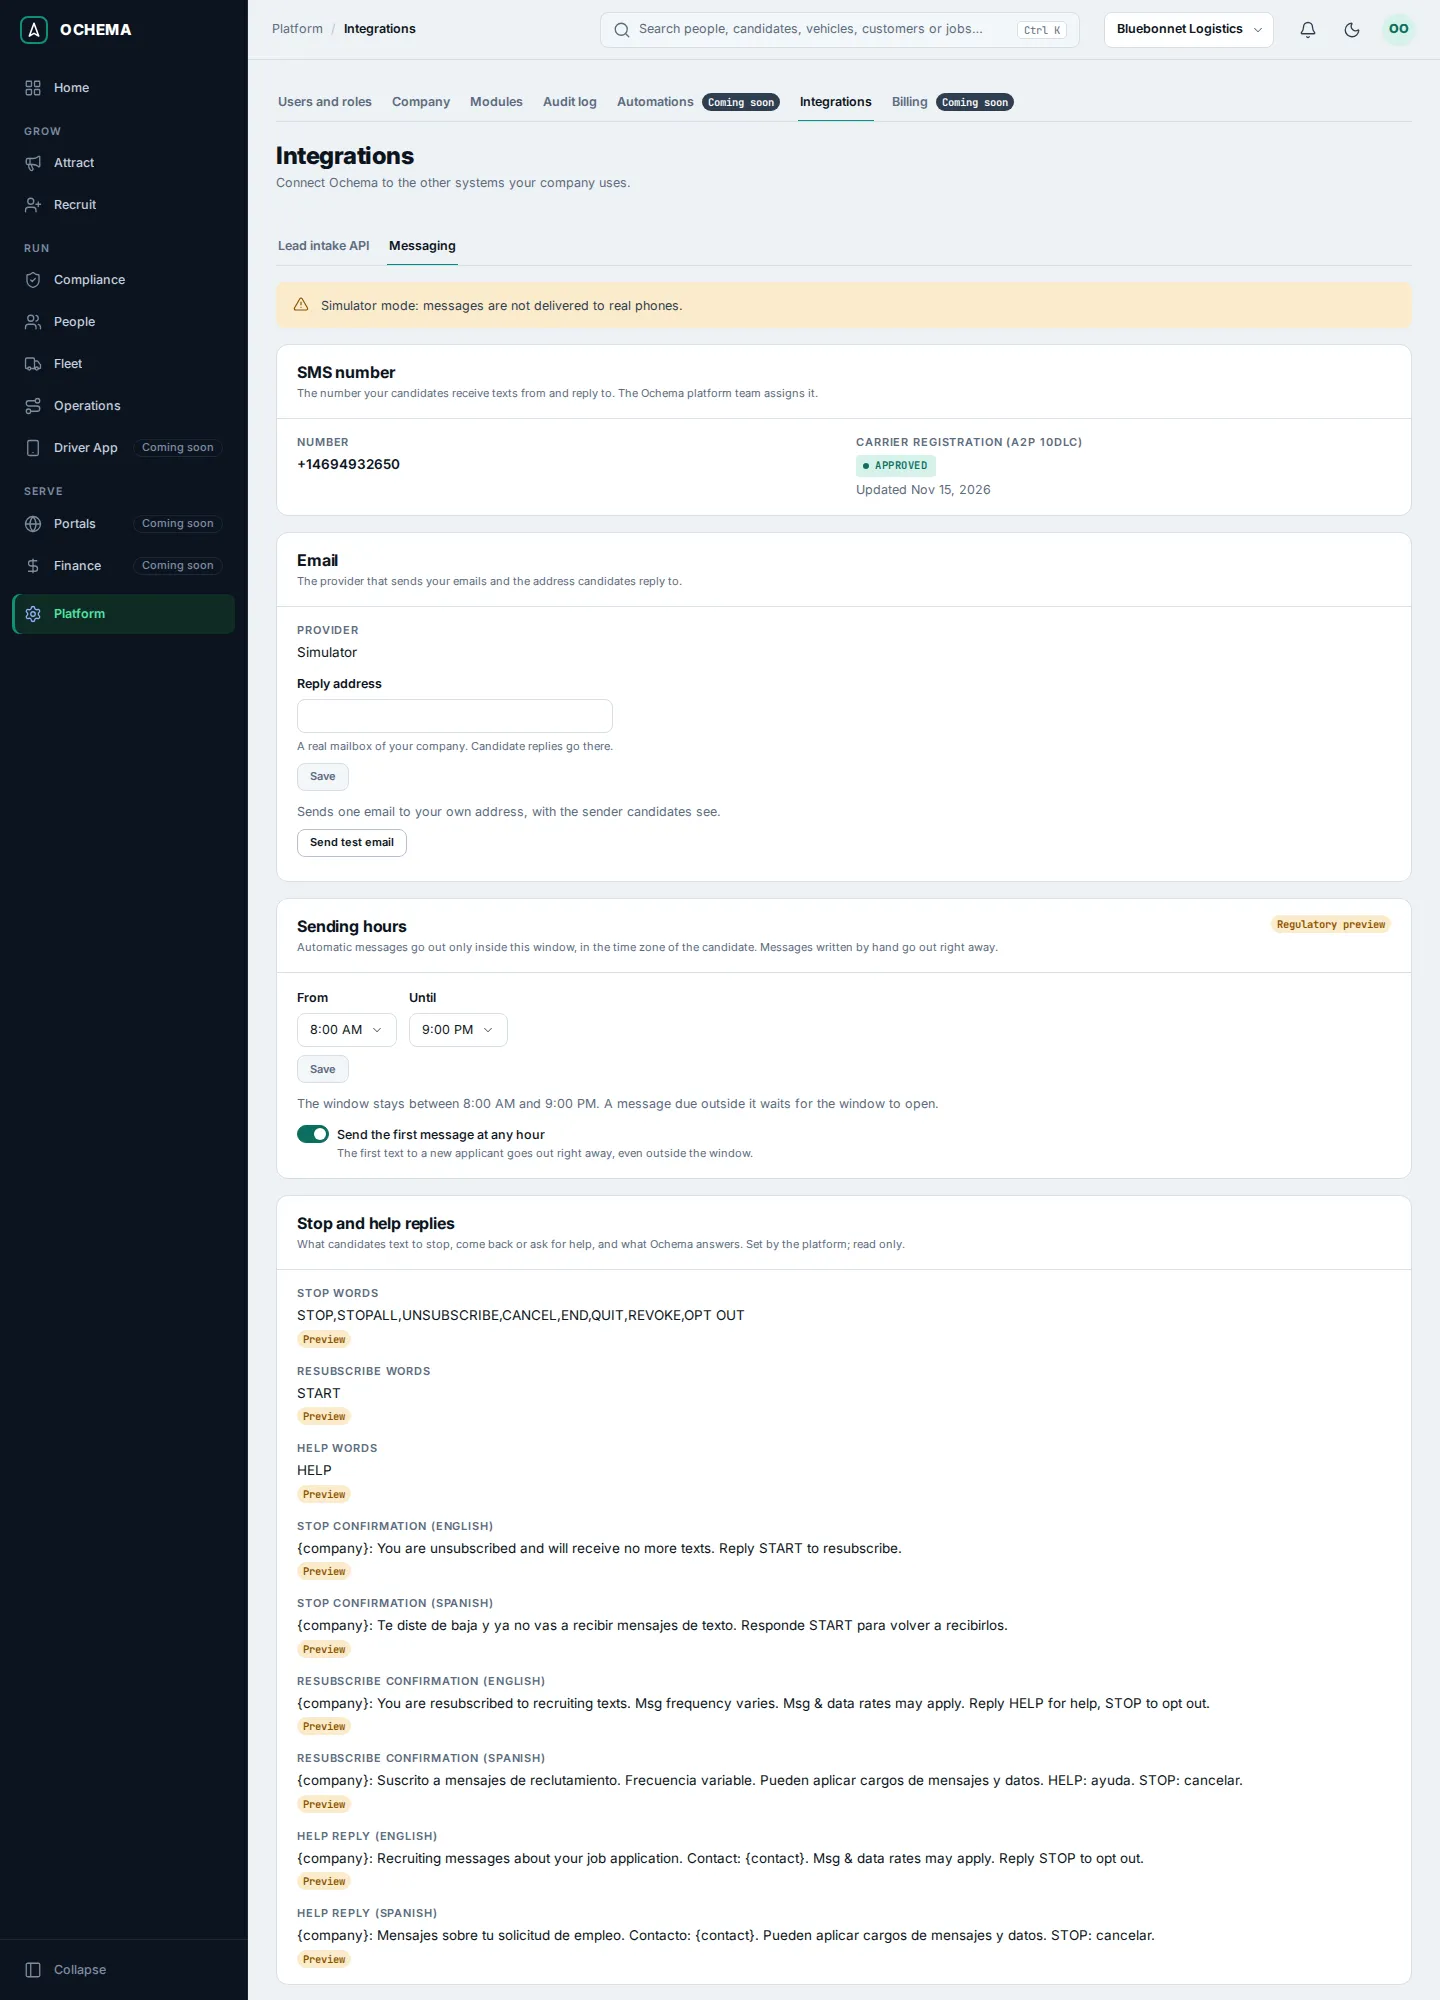
3. The applicant applies on a phone
Section titled “3. The applicant applies on a phone”On the phone of the applicant:
-
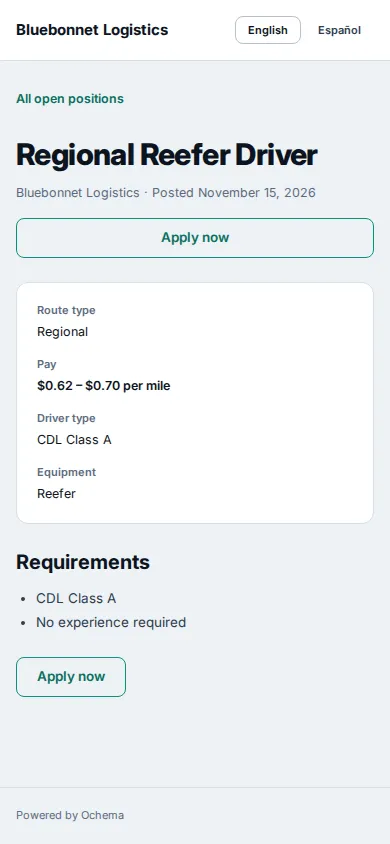
Open the link of the job. The page shows the title, the route type, the pay, the driver type, the equipment and the requirements.
-
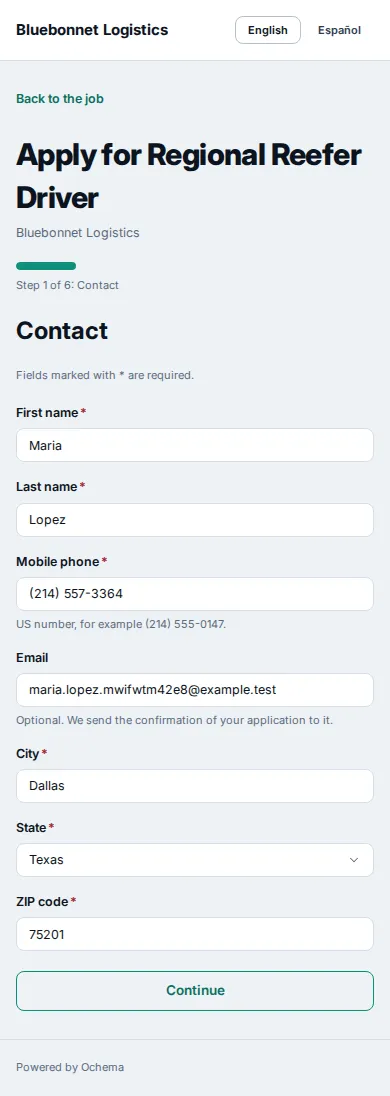
Select Apply now. The form Apply for Regional Reefer Driver opens on the step Contact.
-
Fill in First name, Last name, Mobile phone, Email, City, State and ZIP code. The form marks Email as optional, but Send offer needs the email of the candidate, and without an SMS number the other links go by email too. Select Continue.
-
On the next step, choose the CDL class (Class A) and type the Years of commercial driving experience. Select Continue.
-
Questions about this job lists the questions of the job, if it has any. Select Continue.
-
In What matters to you, check what matters, for example Pay. Select Continue.
-
In How we may contact you, check Text messages (SMS). Without this consent, Ochema sends the applicant no text message. Select Continue.
-
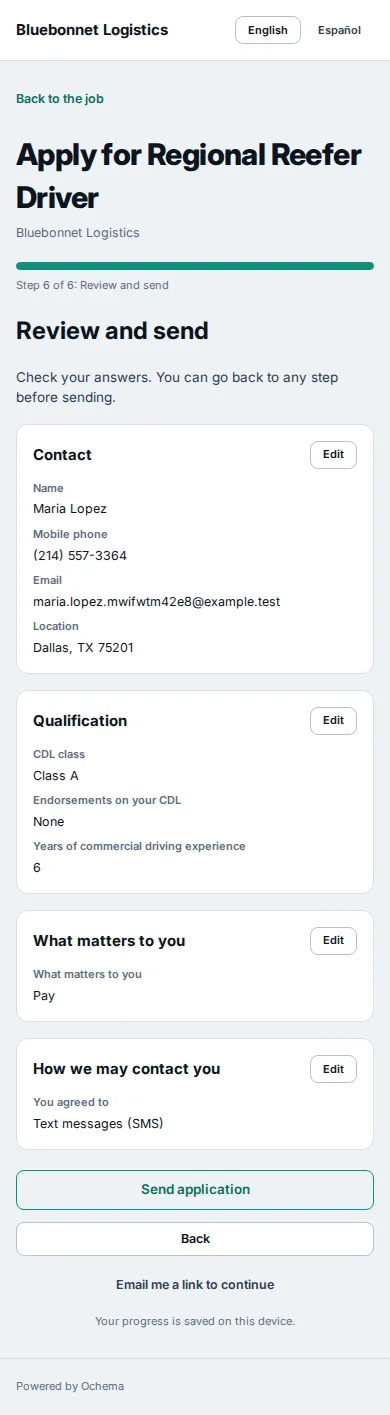
Review and send shows every answer, with Edit next to each part. Select Send application.
-
The page says Thank you. We received your application.
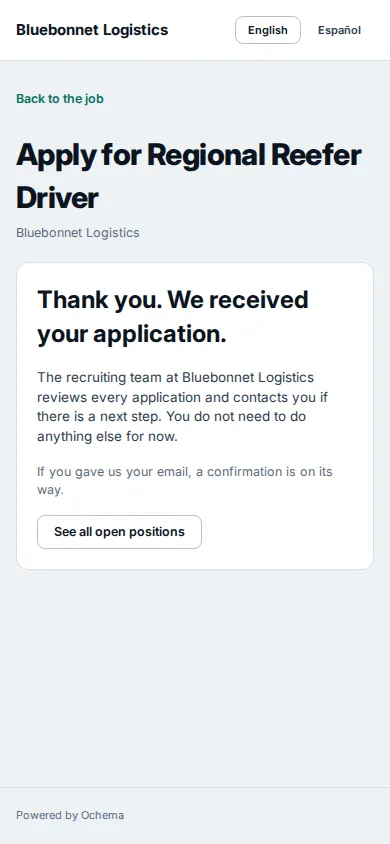
A few seconds later, the rule First response sends the applicant the first text message, if your company has an SMS number.
4. Take the applicant and send the scheduling link
Section titled “4. Take the applicant and send the scheduling link”Back in the office system:
-
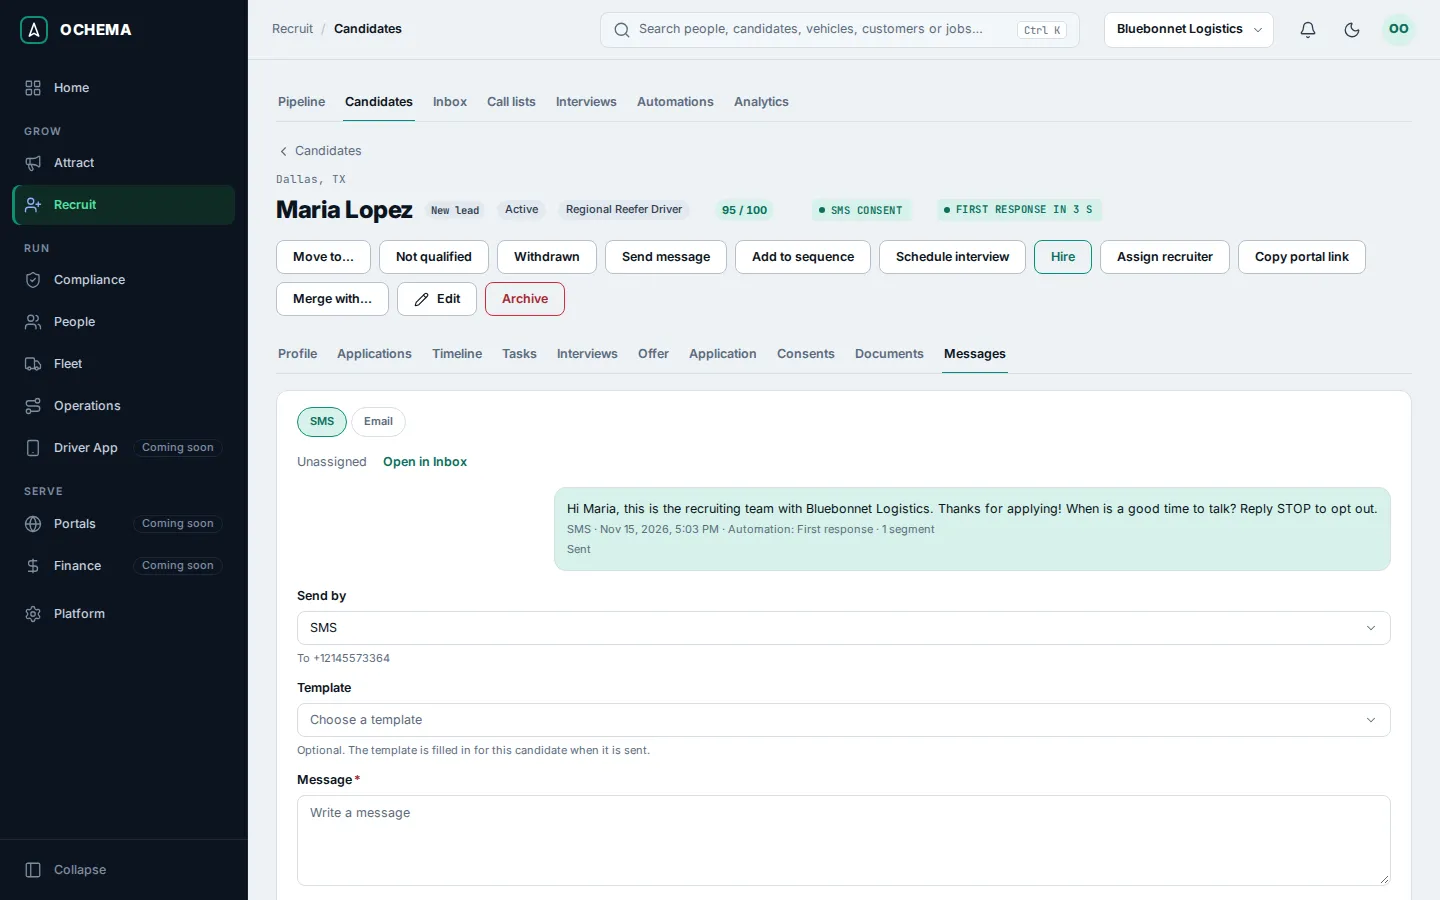
Open Recruit, then Candidates. Search for the last name of the applicant and select the name. The page of the candidate opens. At the top, the marks show the stage (New lead), the job, the score, SMS consent and First response in with the time it took (First SMS not sent while your company has no SMS number).
-
Select the Messages tab. The first text message is there, with Automation: First response and its status. Without an SMS number, the status is Not sent: the company has no approved SMS number yet (Platform > Integrations, Messaging).
-
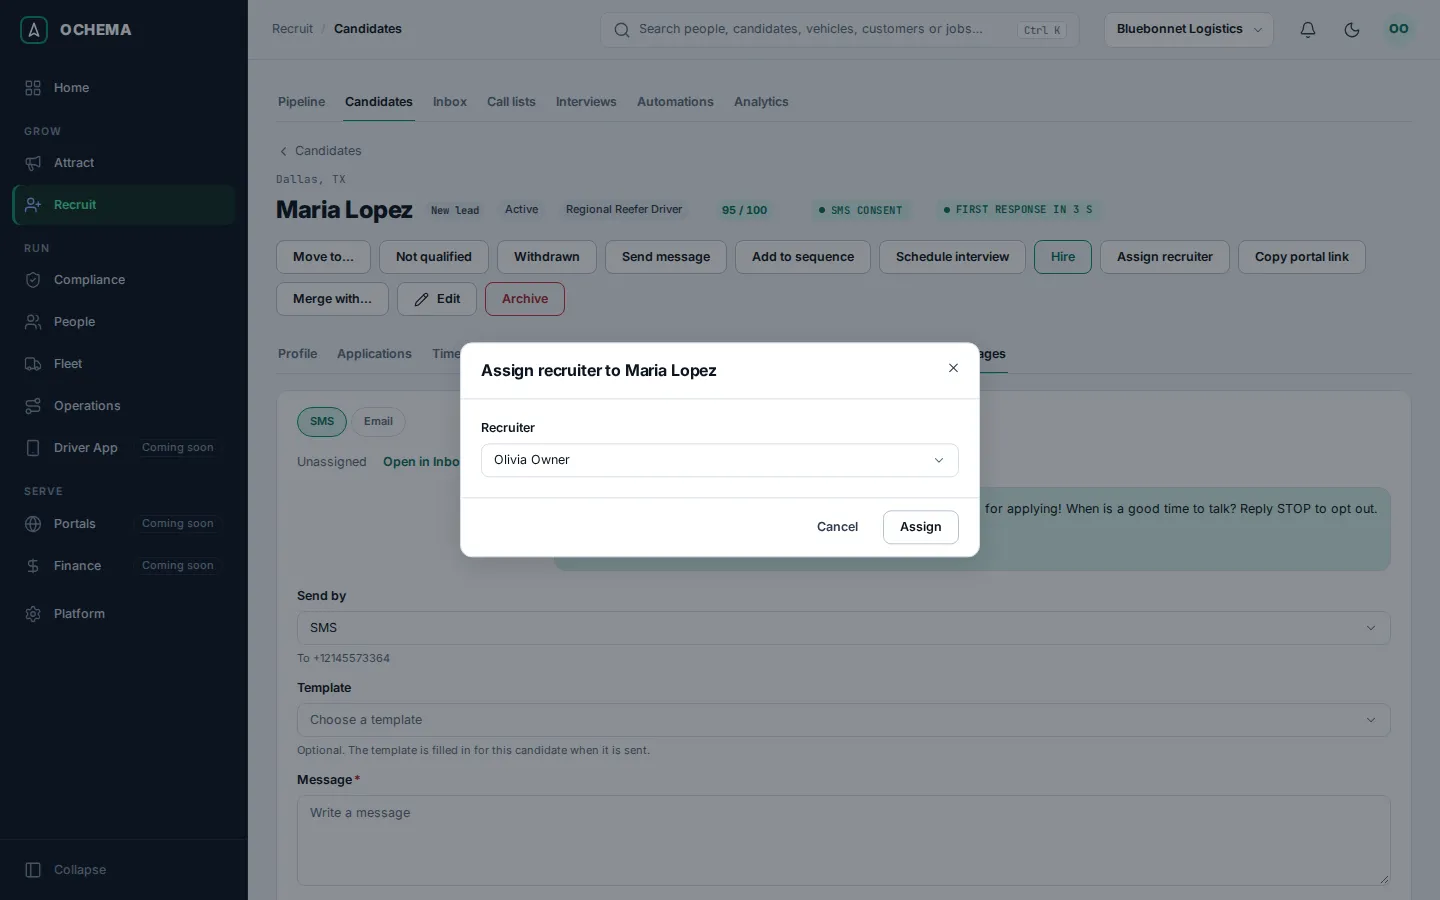
Select Assign recruiter. In the dialog, choose the Recruiter (here, Olivia Owner) and select Assign.
Before the applicant can book, Ochema needs an interview type and the hours of the recruiter.
-
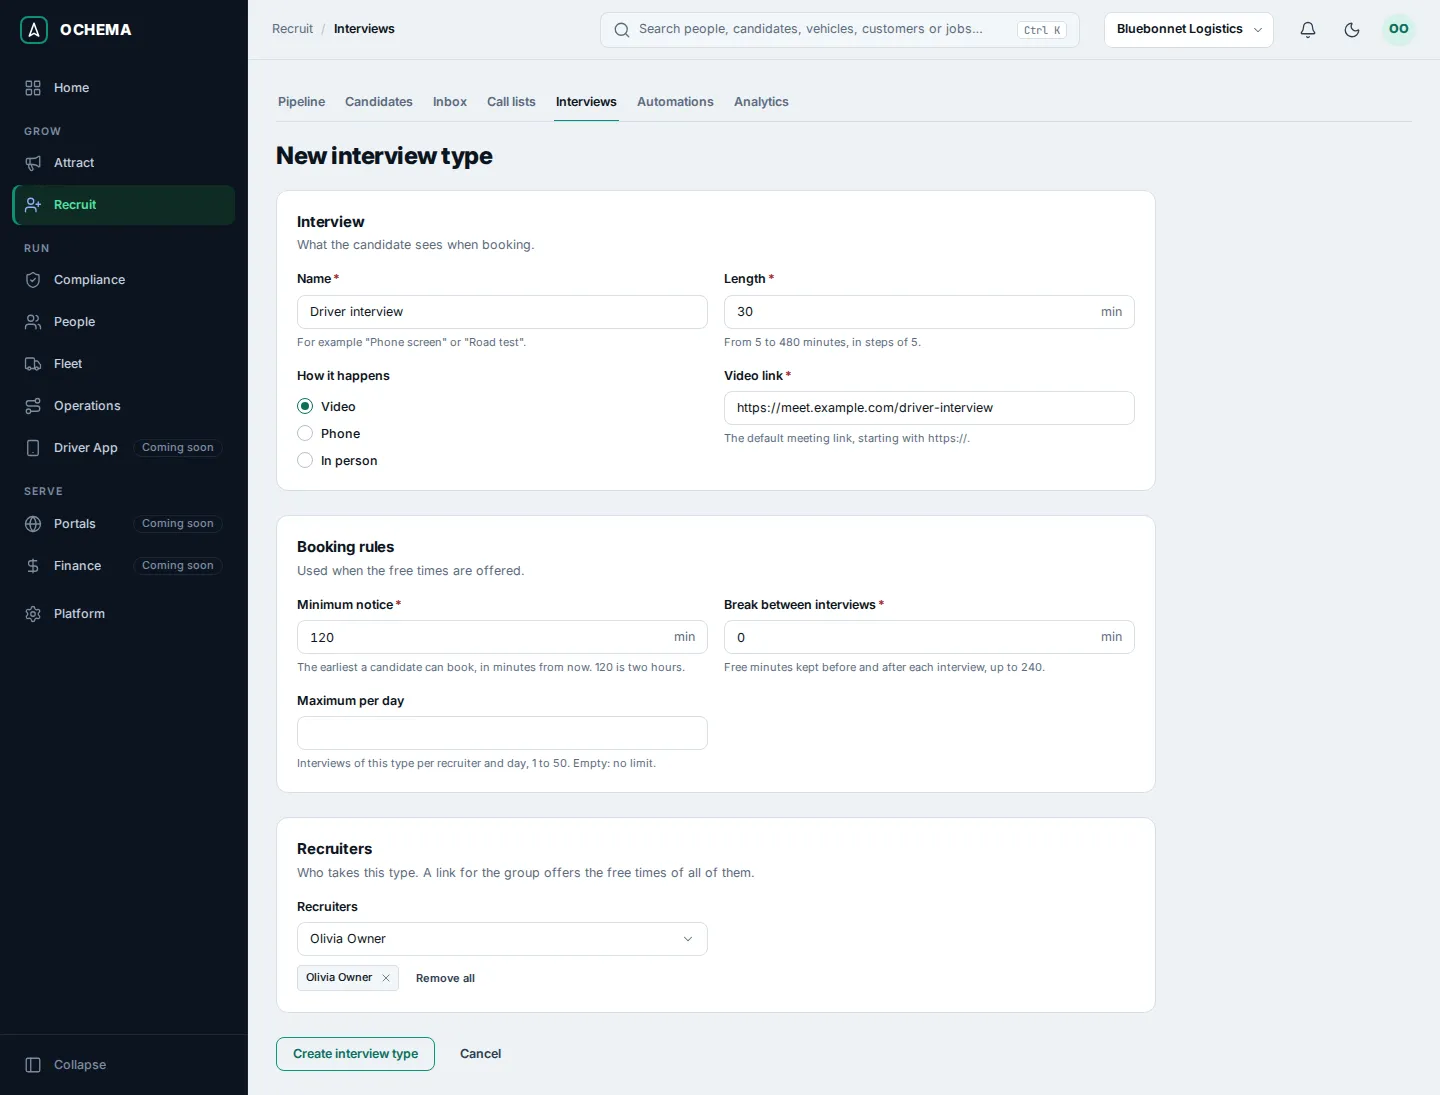
Open Recruit, then Interviews, then the Interview types tab, and select New interview type.
-
Type the Name (each name can be used once; a new company already has a Phone screen type), choose How it happens (Video, Phone or In person) and, for a video interview, the Video link. Check Length, Minimum notice and Break between interviews. Under Recruiters, choose who takes this type. Select Create interview type.
-
After Create interview type, the page of the new type opens, without the tabs. Open Recruit, then Interviews again, and select the Availability tab. Under Weekly hours, select Add hours on each day the recruiter takes interviews and type the start and end times. Check the Time zone. Select Save hours. Until the hours are saved, candidates cannot book with this recruiter.
-
Go back to the page of the candidate and select Schedule interview. In the dialog, under How, choose Send scheduling link. Choose the Interview type, and under Send by, choose Text message, or Email while your company has no SMS number. Select Send link. The message Scheduling link sent to appears.
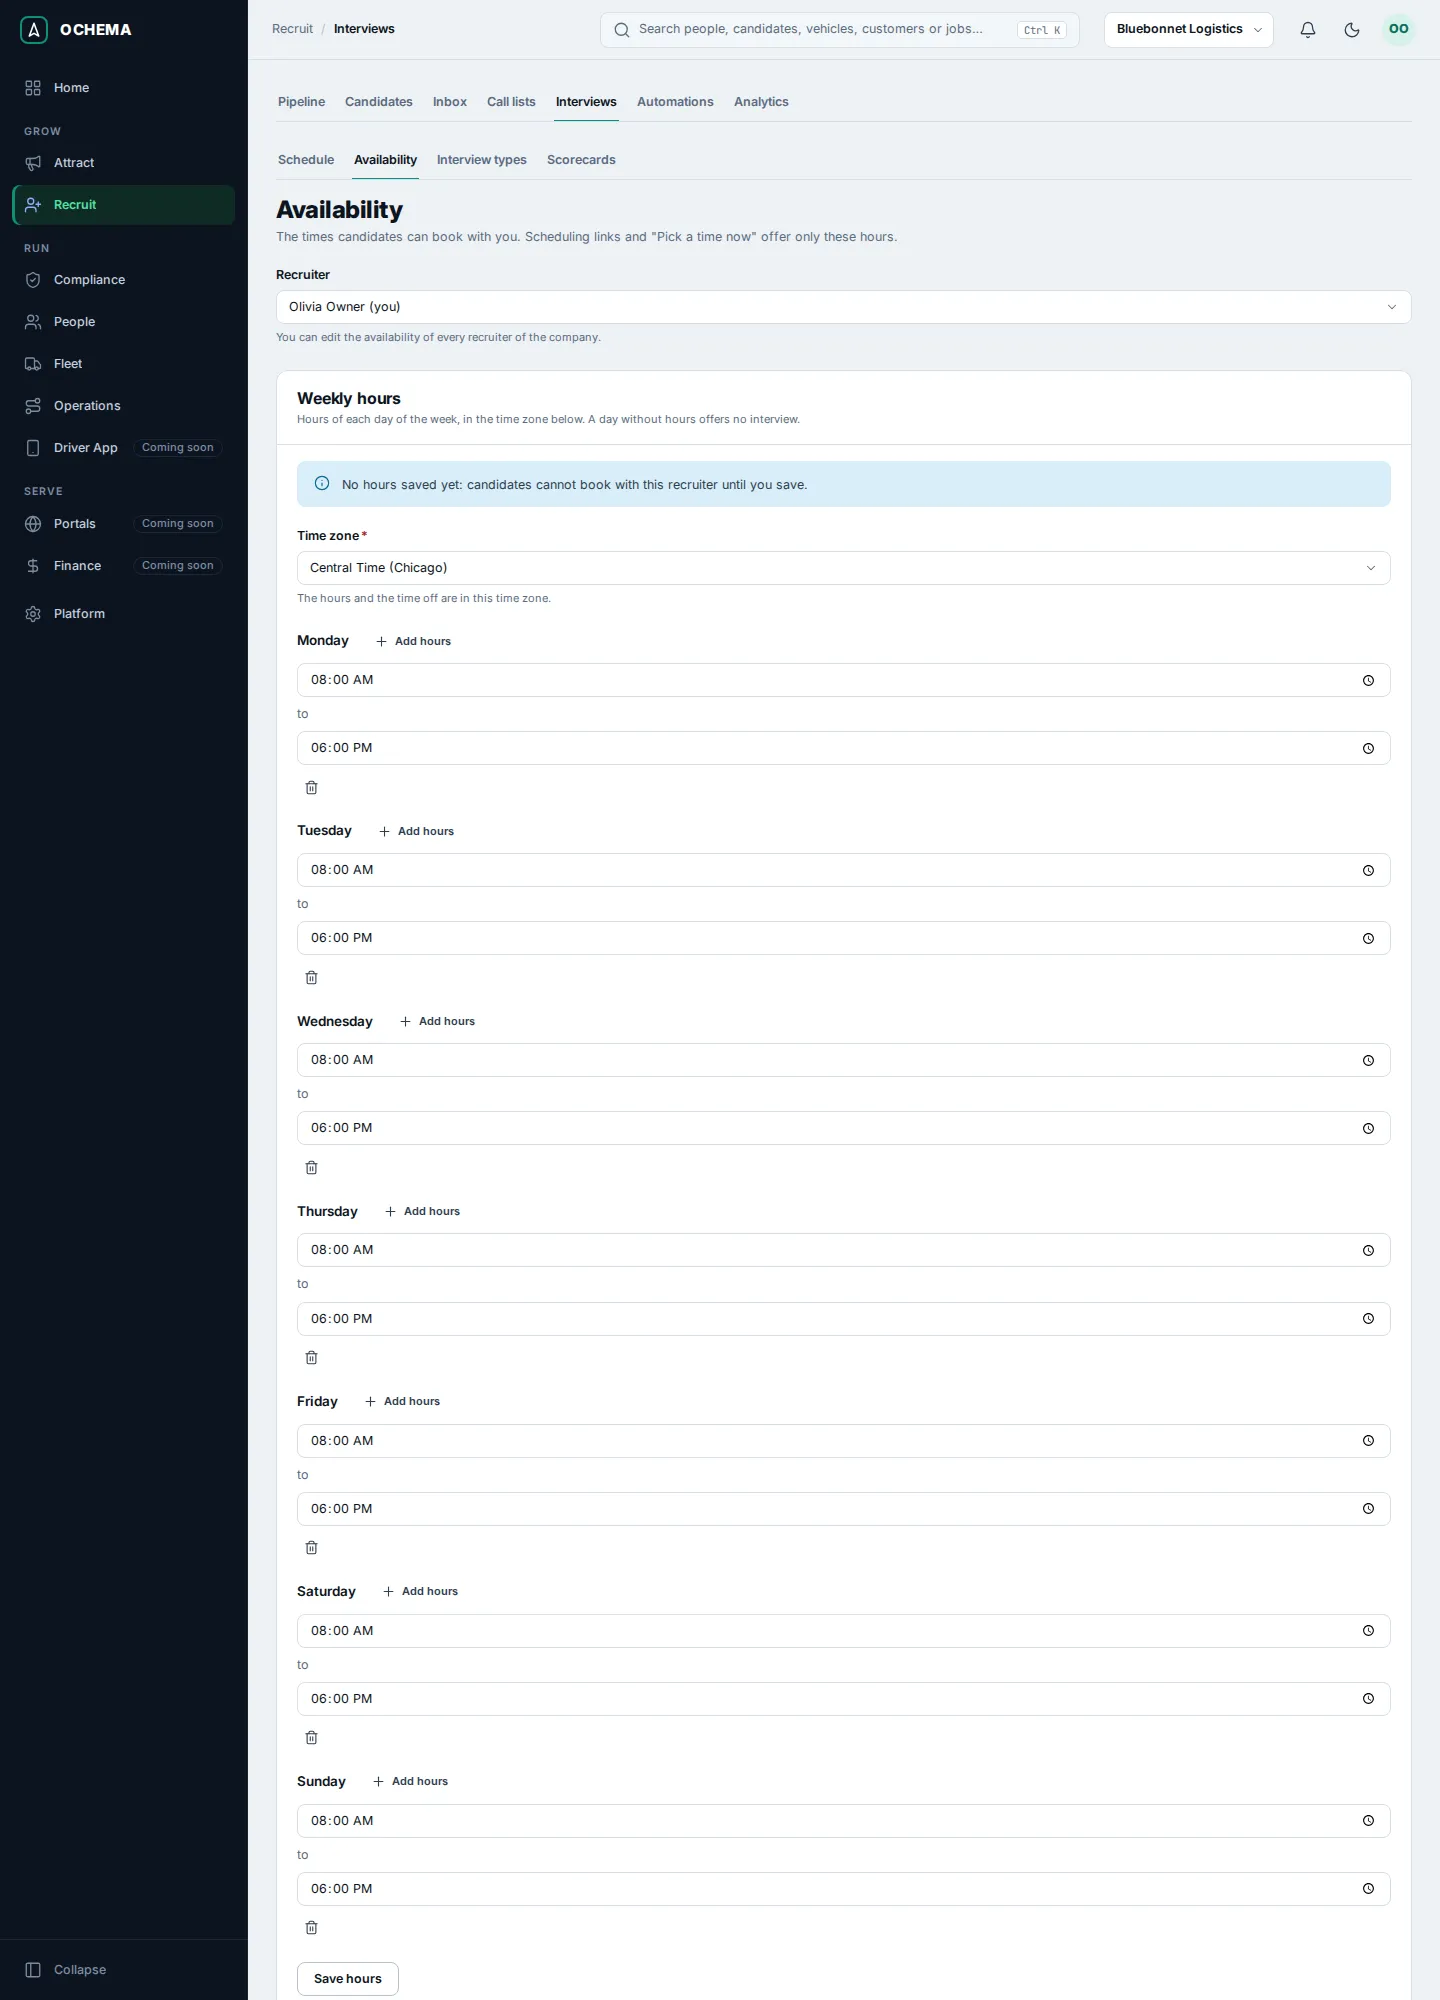
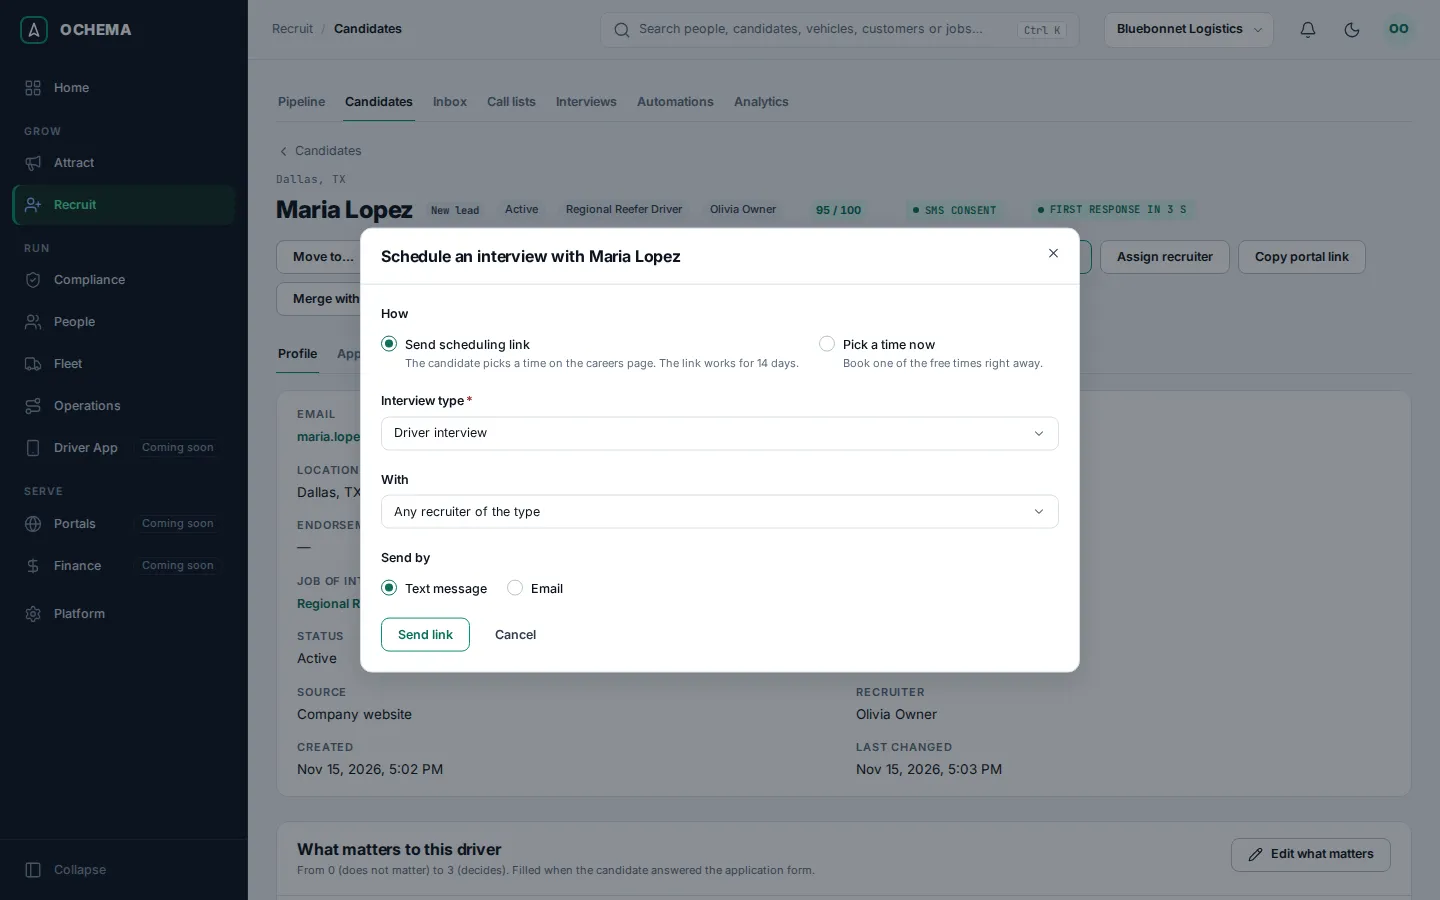
The link works for 14 days. It reaches the phone of the applicant by text message, or the inbox by email, only when that channel is delivered for real (see the note at the top). When it is not, the link cannot be copied from the office system: choose Pick a time now in the same dialog instead, agree on a time with the applicant by phone, choose one of the free times and select Book interview. The message Interview booked for appears, and you skip section 5.
5. The applicant books the interview
Section titled “5. The applicant books the interview”On the phone, the applicant opens the link of the text message or the email:
-
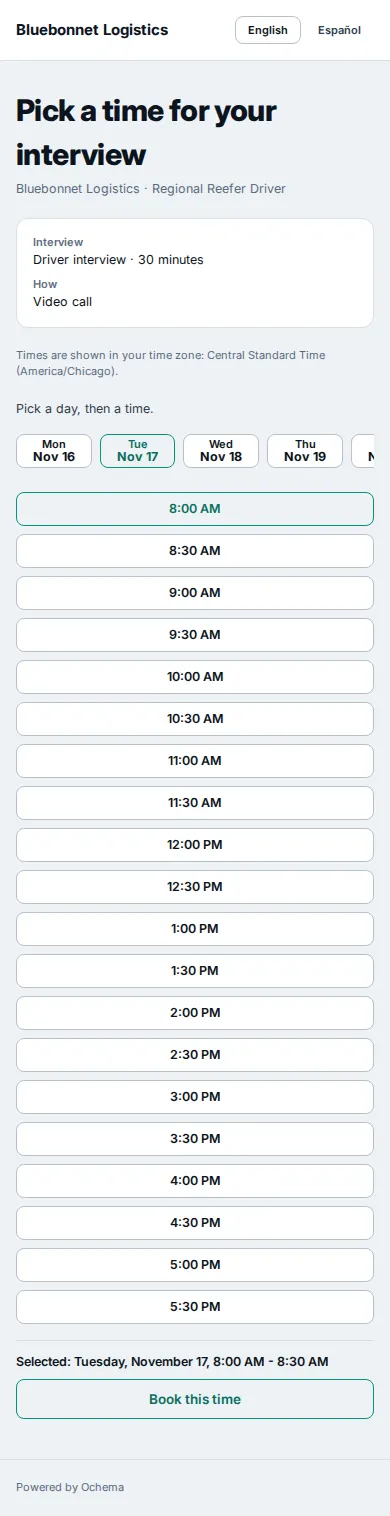
Pick a time for your interview shows the interview and the times, in the time zone of the phone. Select a day, then a time. The line Selected shows the choice.
-
Select Book this time.
-
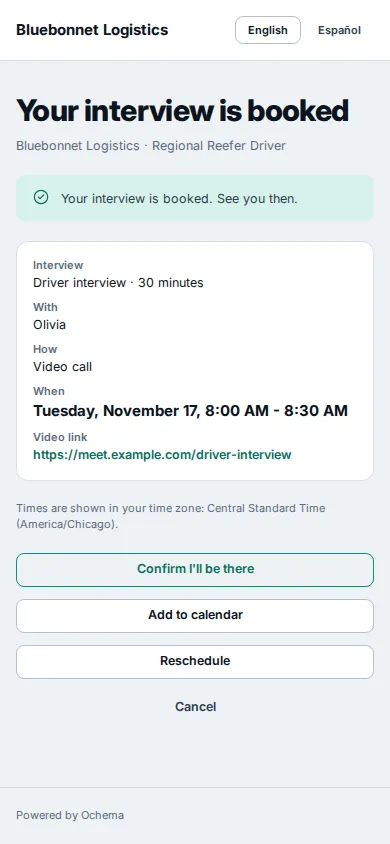
The page says Your interview is booked, with the time and the video link, and the buttons Confirm I’ll be there, Add to calendar, Reschedule and Cancel.
6. Complete the interview and fill the scorecard
Section titled “6. Complete the interview and fill the scorecard”-
After the interview, open Recruit, then Interviews. In View, select List, and select the interview.
-
In the dialog of the interview, select Mark completed. Status shows Completed.
-
Select Fill scorecard. Rate each criterion from 1 Poor to 5 Excellent, choose the Overall recommendation (Strong yes, Yes, No or Strong no) and select Submit. Then close the dialog of the interview.
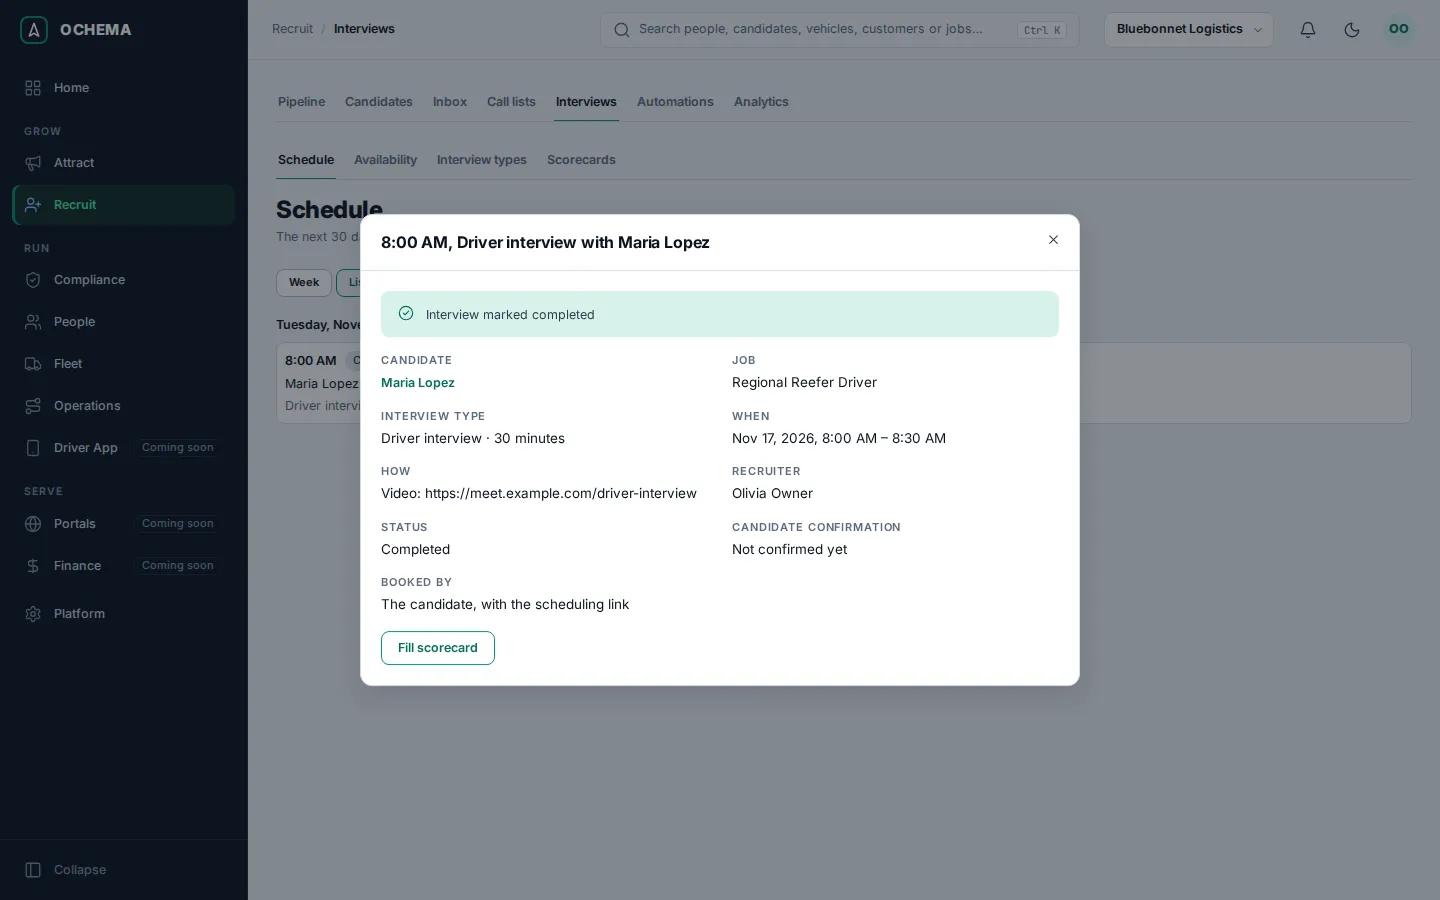
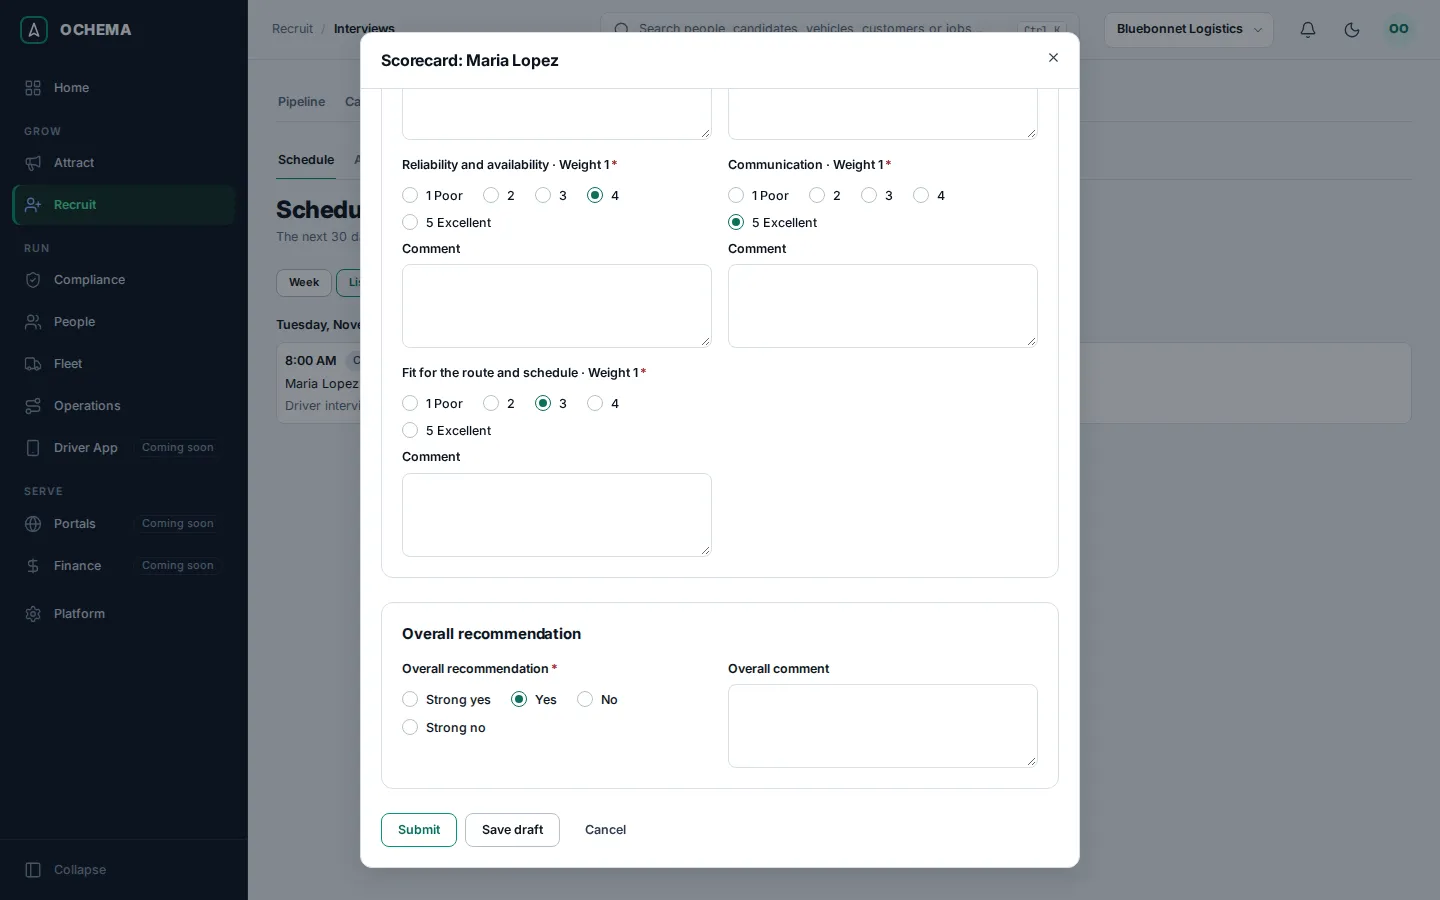
On the page of the candidate, the Interviews tab shows the last submitted scorecard, with its average and the recommendation.
7. Send the offer
Section titled “7. Send the offer”An offer comes from an offer template.
-
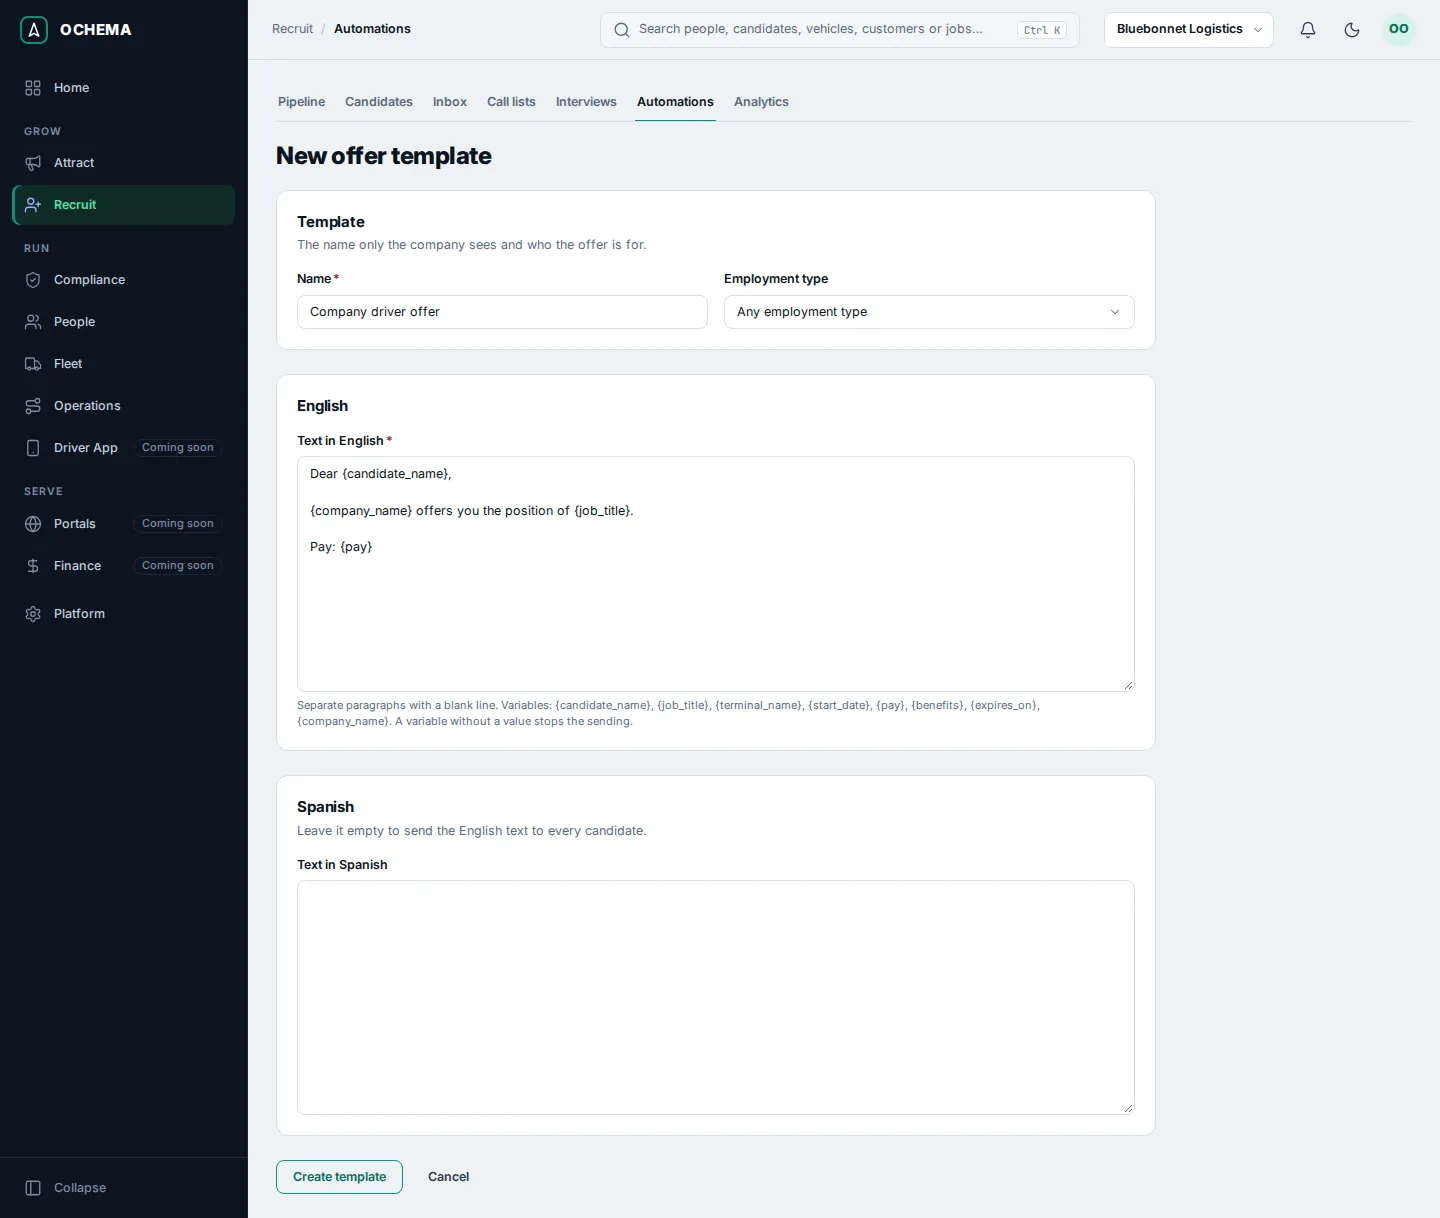
Open Recruit, then Automations, then the Offer templates tab, and select New offer template.
-
Type the Name and the Text in English. The text can use the variables listed under the field, such as
{candidate_name},{company_name},{job_title}and{pay}. Text in Spanish is optional: left empty, every candidate gets the English text. Select Create template. -
On the page of the candidate, select the Offer tab, then Send offer.
-
Choose the Offer template, check the Language and Employment type, and type the Pay in words, as the candidate reads it, for example
$0.62 per mile. Valid for (days) is 7 by default. The Preview shows the offer. Select Send offer.
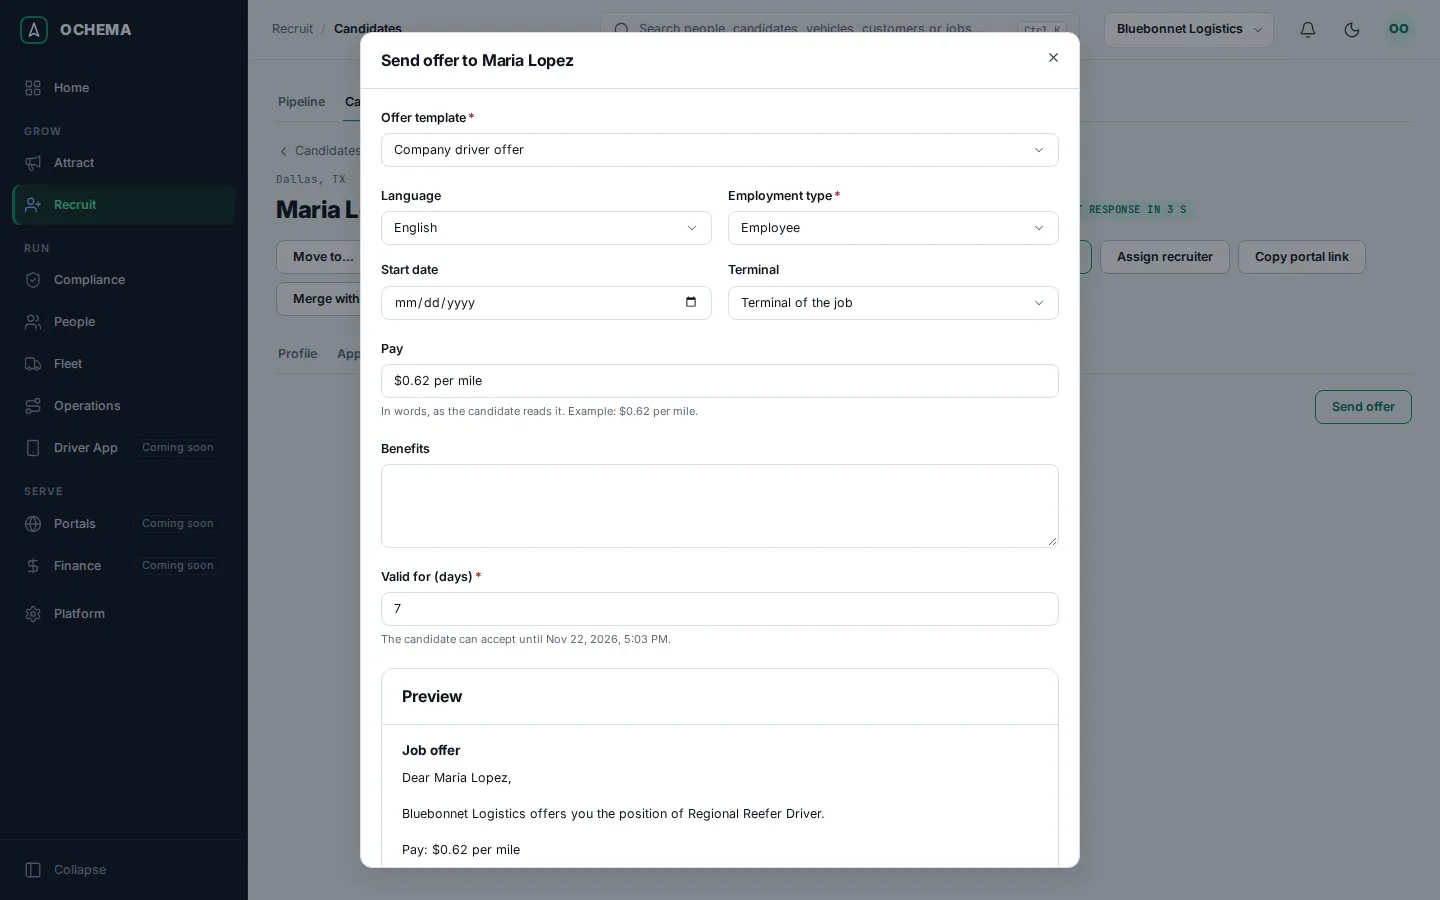
Ochema emails the offer to the candidate, with a link to sign it. If emails of your company are not delivered (see the note at the top), select Copy link on the Offer tab, then Create and copy link, and send the link to the applicant yourself. Each copy makes a new link, and the link of the email, or one copied before, stops working. The open offer also shows in the candidate area, under Answer your job offer, with Open offer. See Offers.
8. The applicant signs the offer
Section titled “8. The applicant signs the offer”On the phone, the applicant opens the link of the email, or the link you copied:
-
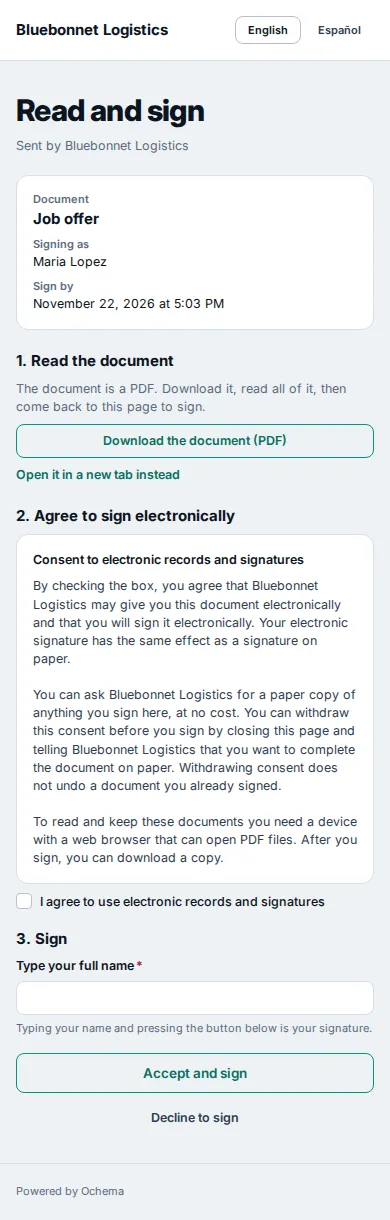
Read and sign shows the document, who sent it, and the date to sign by. Select Download the document (PDF) and read it.
-
Check I agree to use electronic records and signatures.
-
Type the full name in Type your full name and select Accept and sign.
-
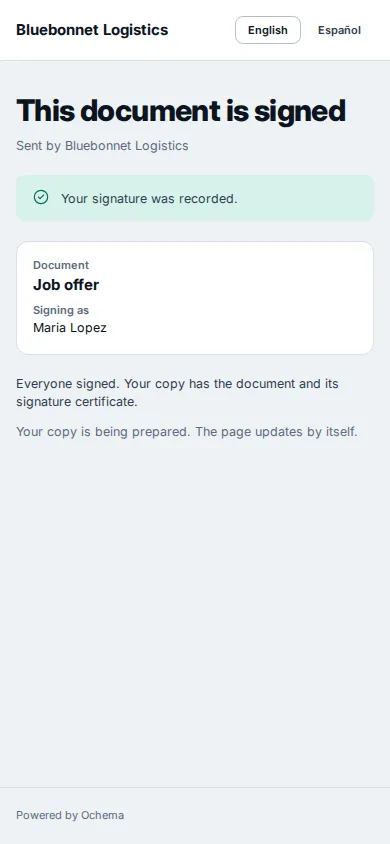
The page says This document is signed. The copy of the applicant, with the signature certificate, is prepared and appears on the same page.
In the office system, the Offer tab of the candidate shows Accepted, with Hire and Download signed offer (PDF).
Open the screenshot at full size in a new tab: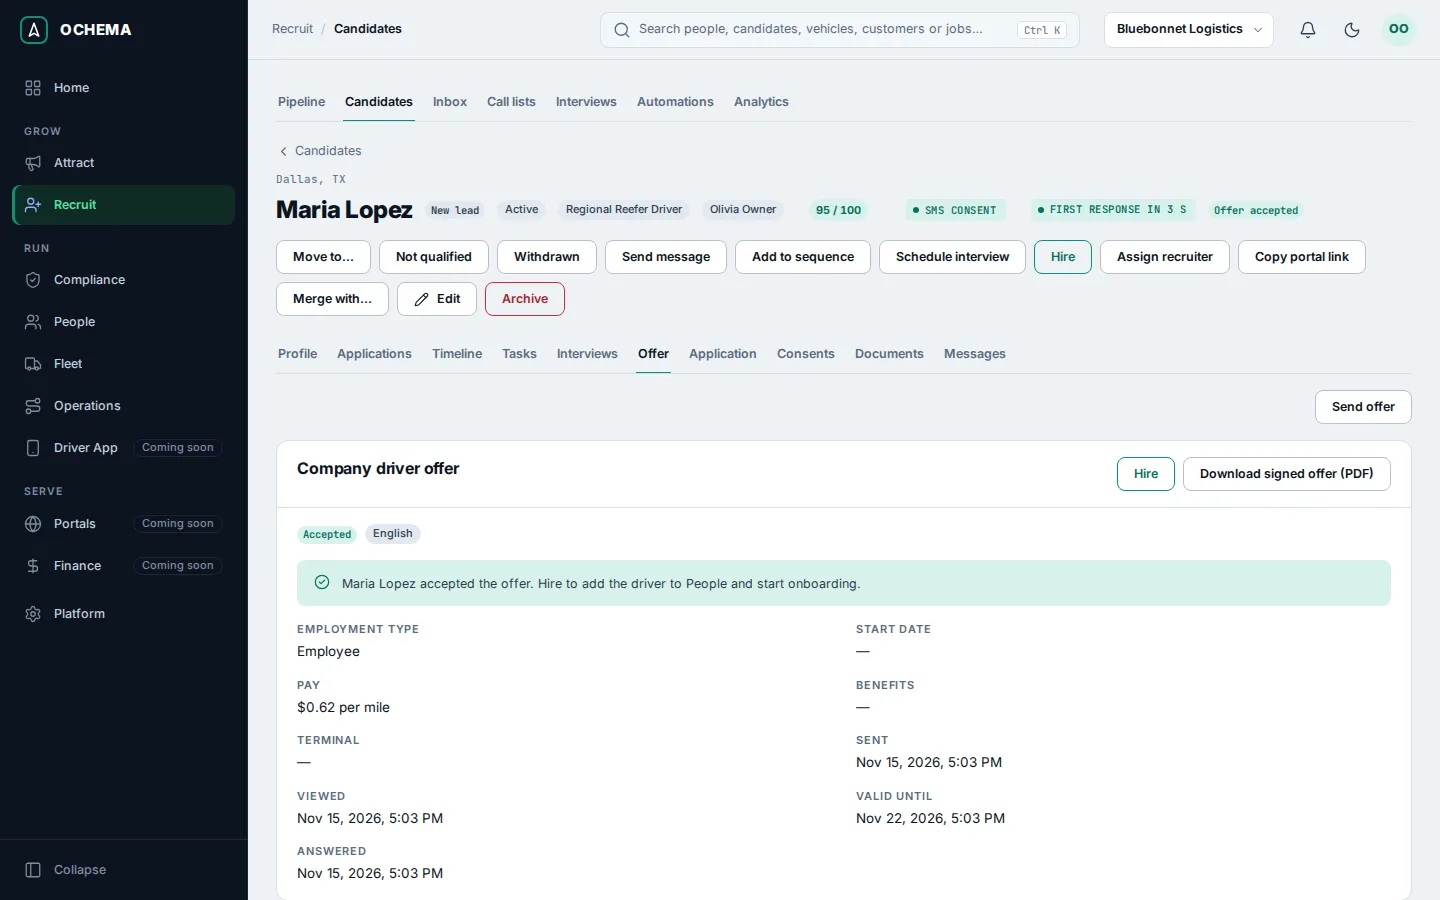
9. Send the full application
Section titled “9. Send the full application”The full application is the driver’s application for employment that the regulation asks for: personal details, addresses, licenses, employment history, accidents and violations, and the authorizations, signed.
- On the page of the candidate, select the Application tab, then Send full application.
- Under Send by, choose Email or Text message (Email while your company has no SMS number). The link is valid for 30 days while the application is active. Select Send full application. The status changes to Sent.
The link reaches the applicant by the email or text message. If the channel you chose is not delivered for real (see the note at the top), select Copy link on the Application tab, then Create and copy link, and send the link to the applicant yourself. Copy link and Resend (by the same or the other channel) each make a new link, and the old one stops opening; what the applicant already saved stays.
Open the screenshot at full size in a new tab: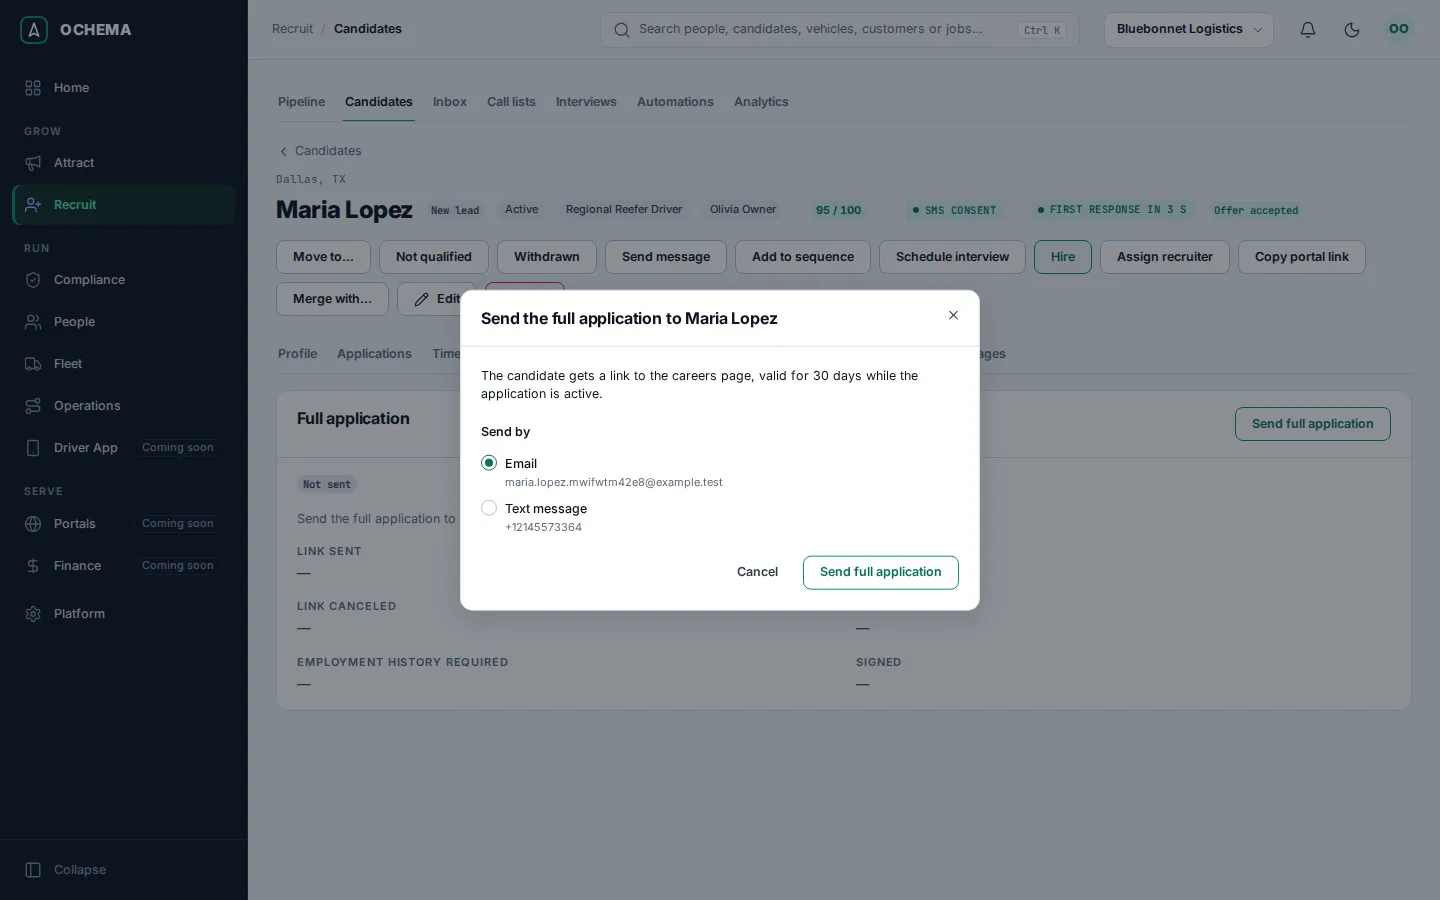
10. The applicant fills and signs the full application
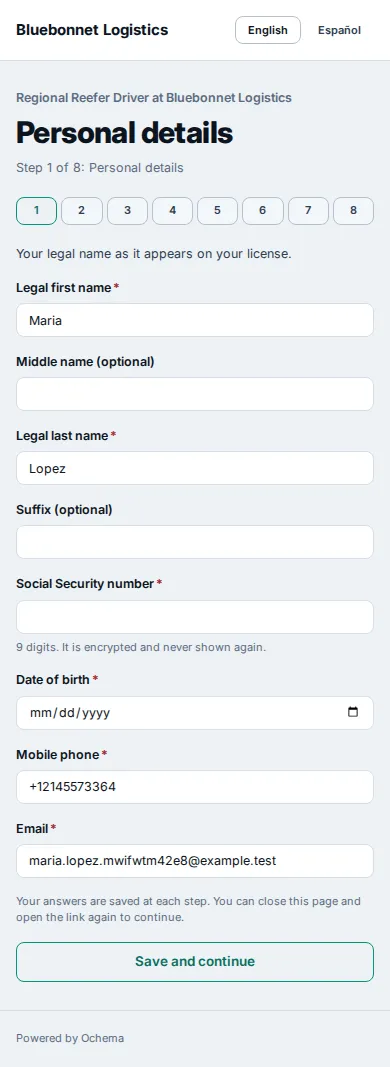
Section titled “10. The applicant fills and signs the full application”On the phone, the applicant opens the link. The application has 8 steps, and each one is saved with Save and continue: the applicant can close the page and open the link again later to continue where they stopped.
-
Personal details: what the applicant already gave comes filled in. Type the Social Security number (it is encrypted and never shown again in full) and the Date of birth.
-
Addresses: the addresses of the last 3 years.
-
Licenses: the licenses of the last 3 years, with the state, number, class and expiration, and This is a commercial driver license (CDL) for a CDL.
-
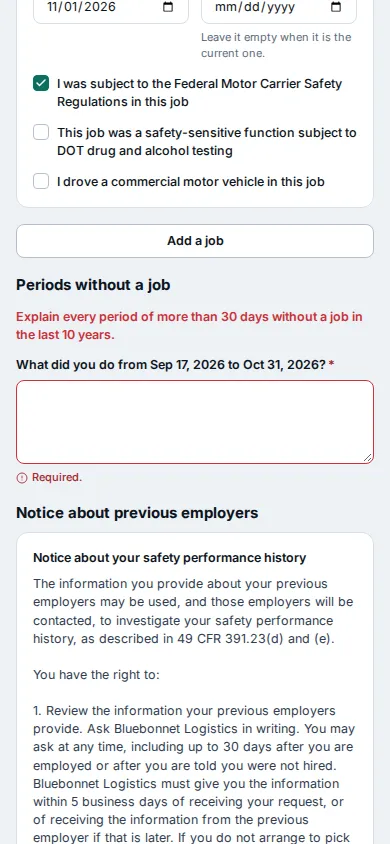
Employment history:
- At the top, the step says The job you are applying for needs a CDL. and asks Did you ever drive a commercial motor vehicle before? The answer is required. With Yes, as for a CDL driver like Maria, the applicant lists the jobs of the last 10 years; with No, of the last 3 years.
- For each job, the Company name (required), the address and contact, and the From and To dates, with To left empty for the current job. A job that ended asks for the Reason for leaving, which is required. Check I was subject to the Federal Motor Carrier Safety Regulations in this job where it applies. Add a job adds the next one, including jobs outside driving.
- Below the jobs, Periods without a job asks What did you do from … to …? for each period of more than 30 days that the saved jobs do not cover. When the step opens, before any job is saved, it already shows one period covering the last 3 years. After Save and continue, the step stays open and asks only for the periods the jobs leave uncovered: answer each one and select Save and continue again.
- Check I read the notice about previous employers.
-
Experience and record: the driving experience, the accidents and the traffic violations of the last 3 years, or I had no accidents in the last 3 years and I had no traffic violations in the last 3 years.
-
Questions: whether a license was ever denied, suspended or revoked.
-
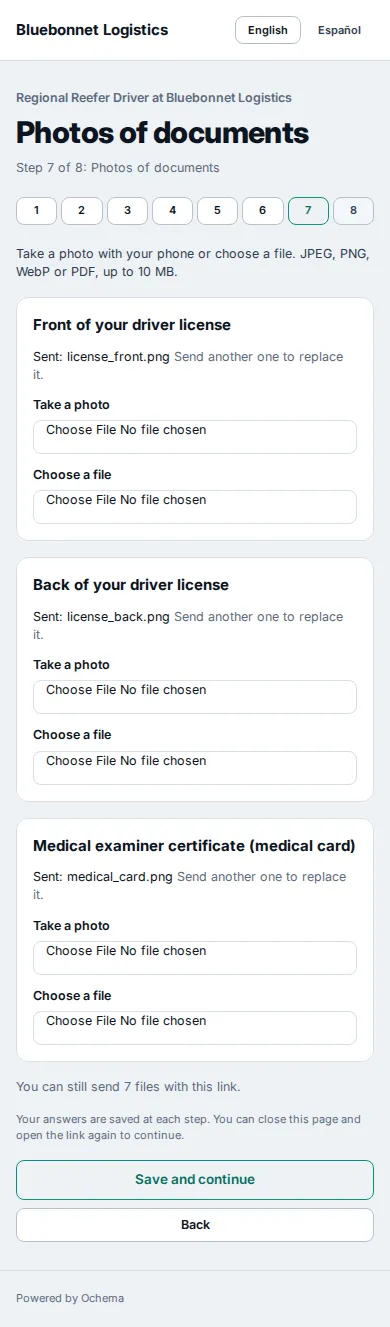
Photos of documents: the front and back of the driver license and the medical card, with Take a photo or Choose a file.
-
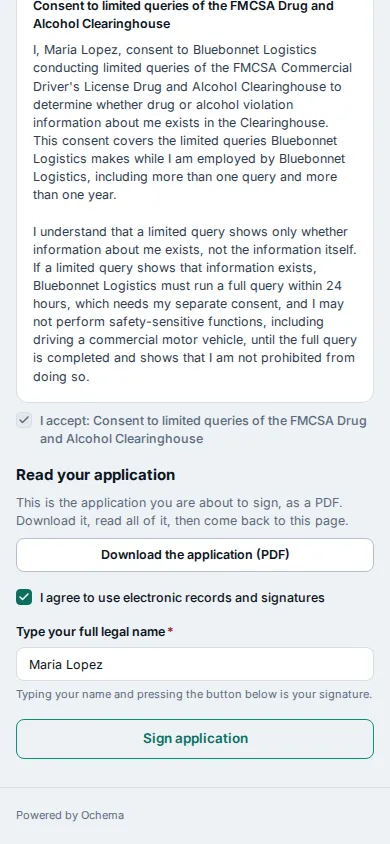
Authorizations and signature: read and accept each text: the applicant certification, the authorization to investigate previous employment and driving record, one consent to release drug and alcohol testing information for each previous employer subject to the FMCSRs, and the consent to limited queries of the FMCSA Drug and Alcohol Clearinghouse. Select Review and sign.
-
Select Download the application (PDF) and read it. Check I agree to use electronic records and signatures, type the name in Type your full legal name and select Sign application.
-
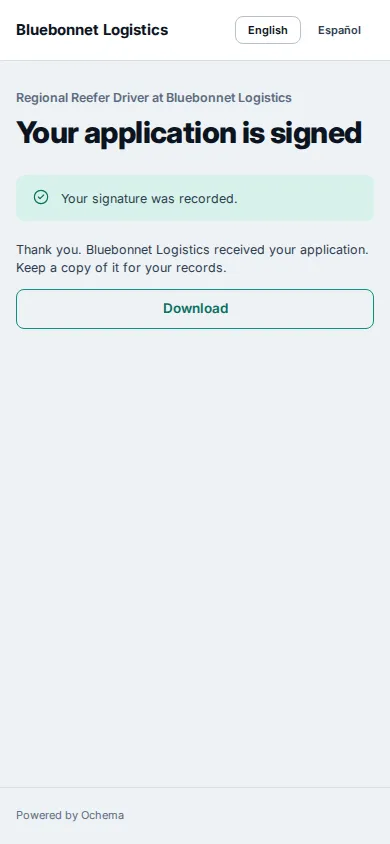
The page says Your application is signed, with Download for the copy of the applicant.

In the office system, the Application tab of the candidate shows Signed, every part of the application, Download signed PDF and Request changes. The Social Security number and the license number show masked; Reveal shows them, and each reveal is recorded.
Open the screenshot at full size in a new tab: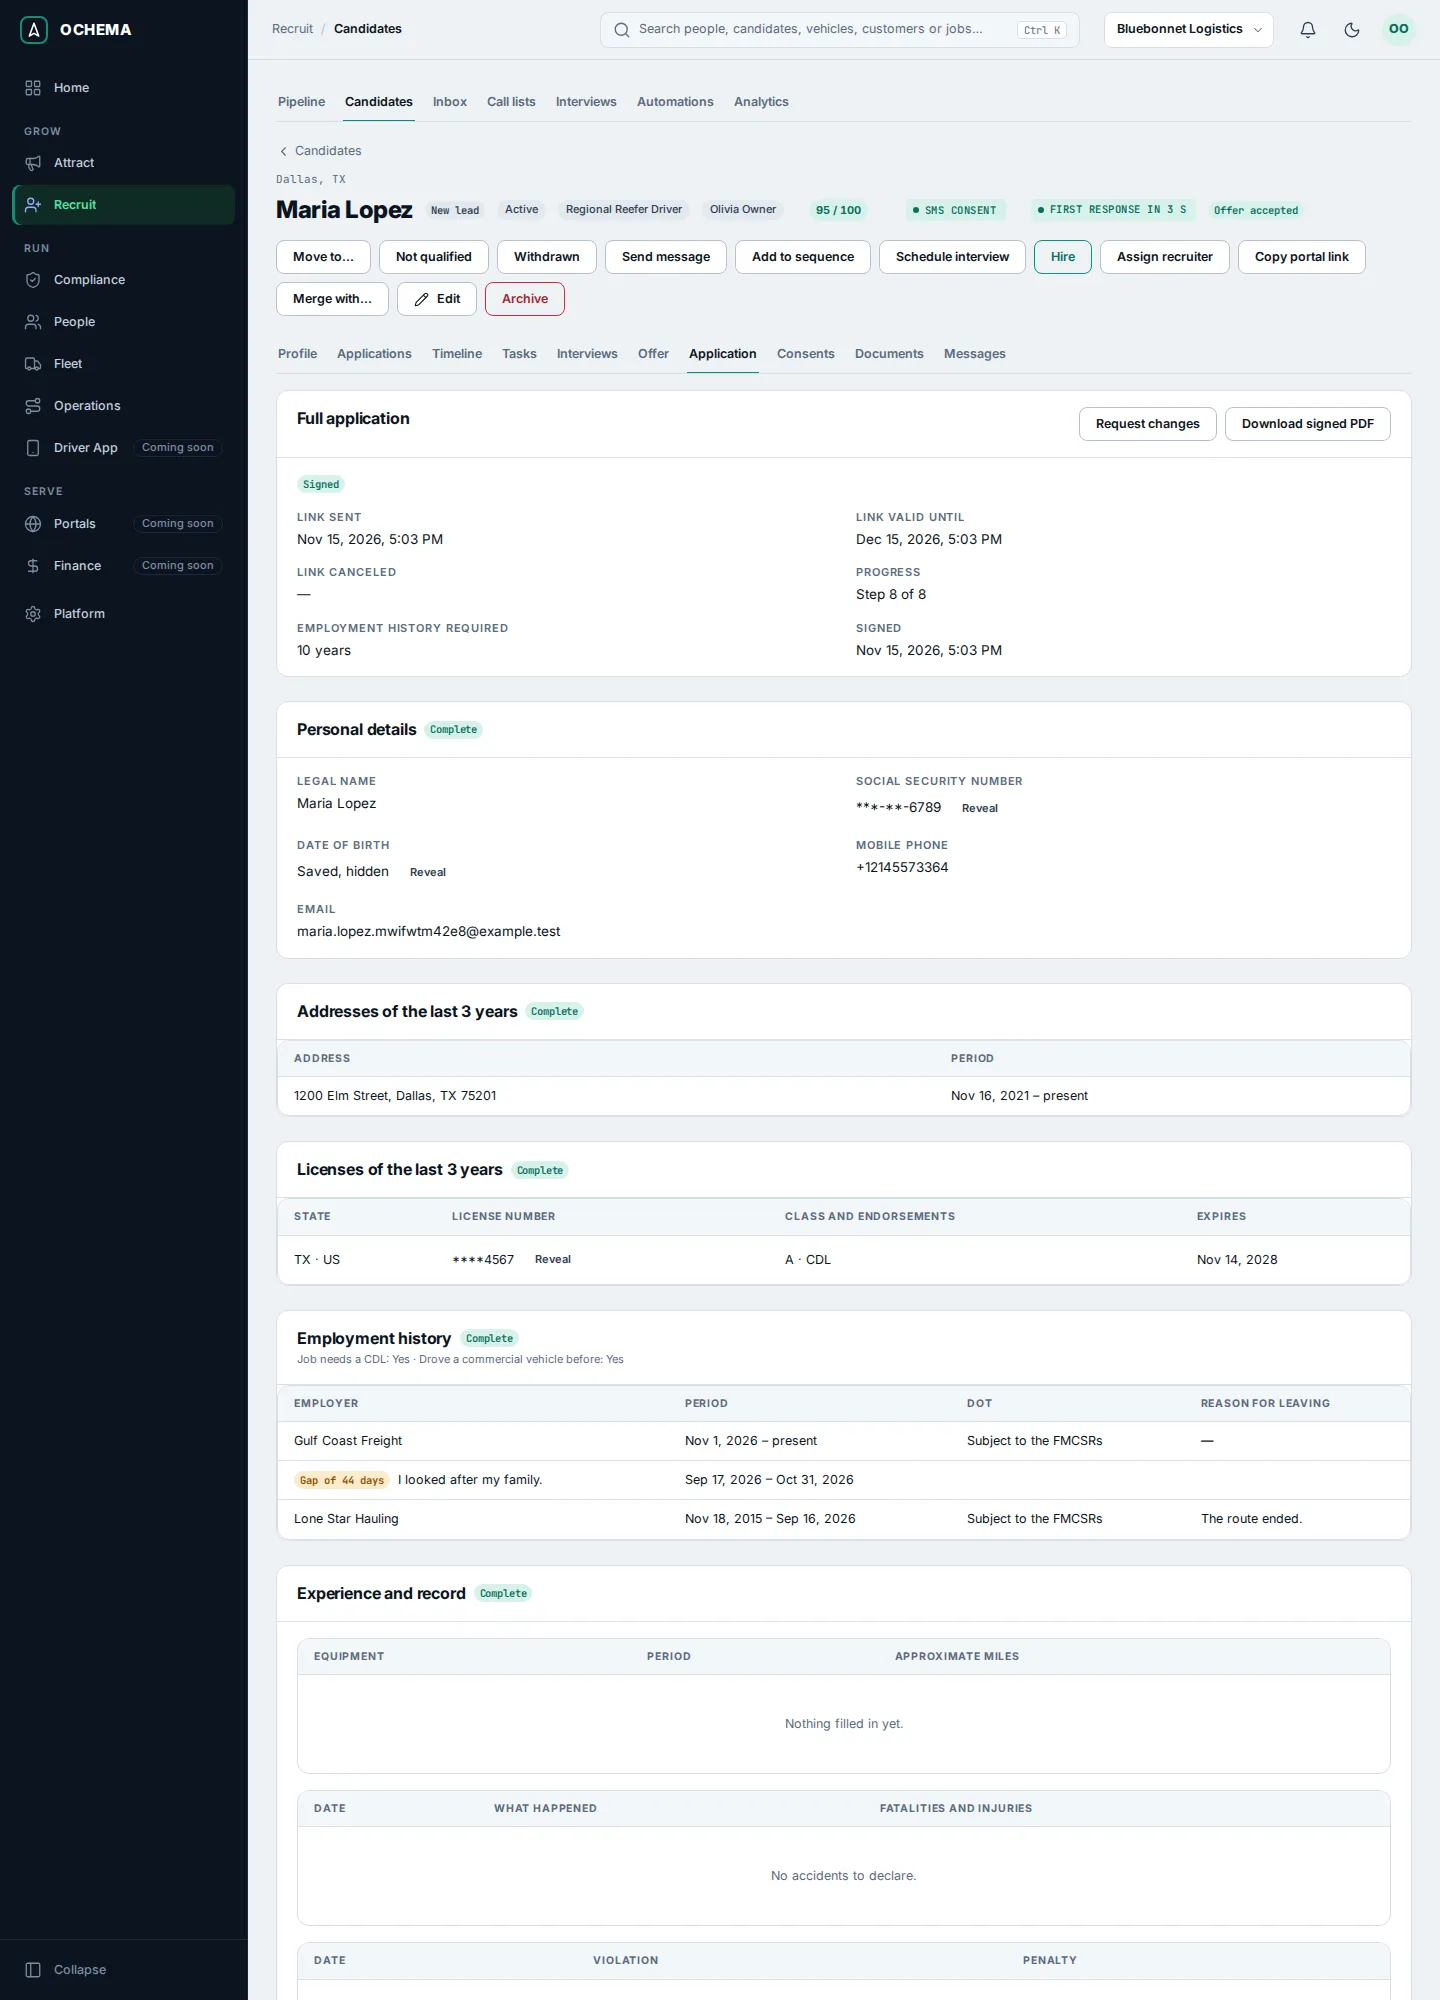
11. Start the pre-hire screening and hire
Section titled “11. Start the pre-hire screening and hire”-
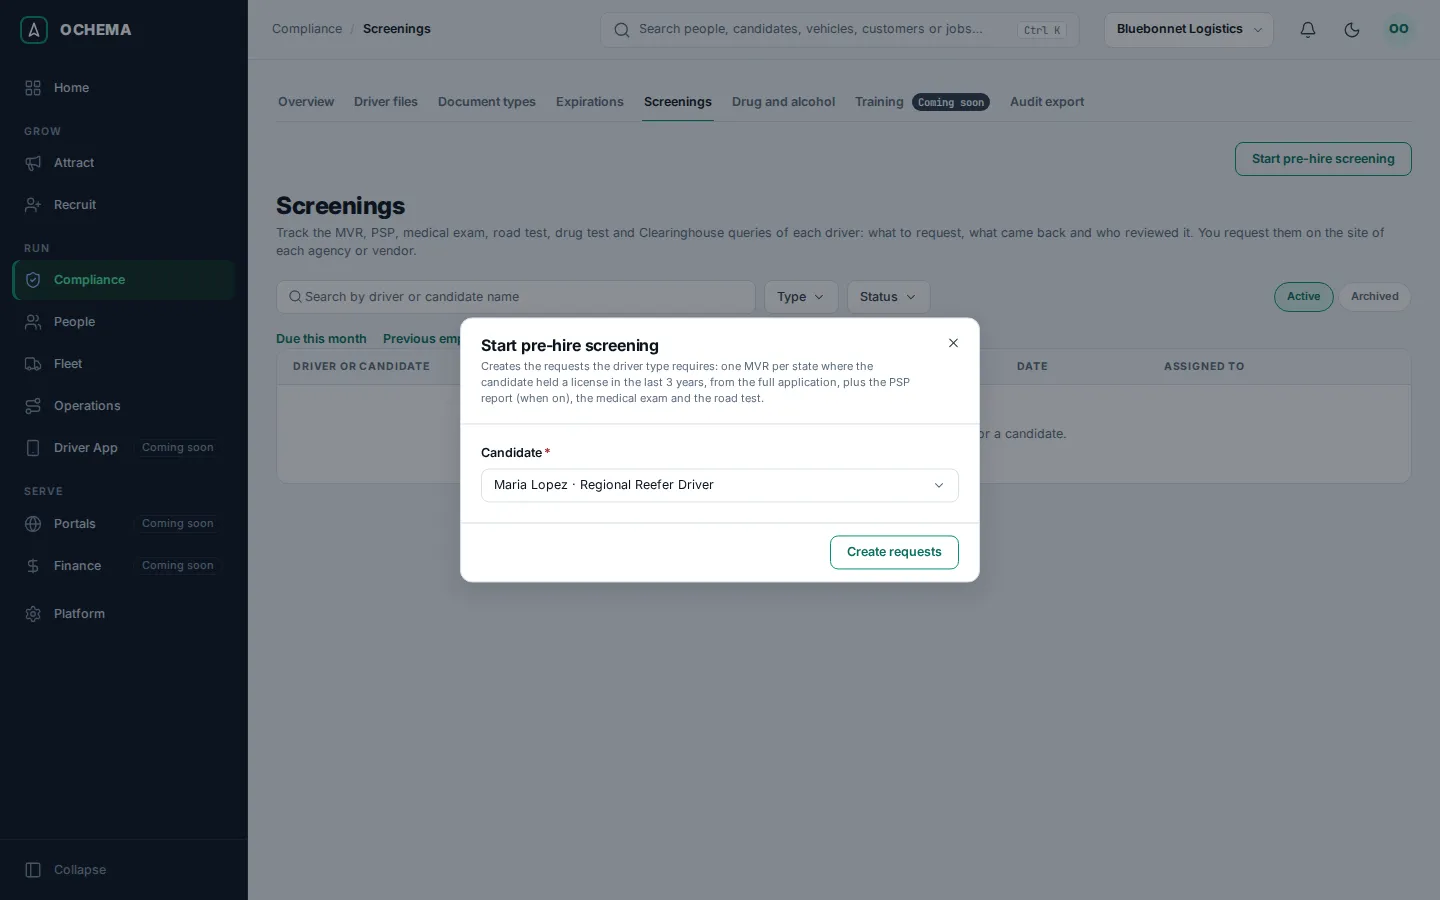
Open Compliance, then Screenings, and select Start pre-hire screening. Choose the Candidate and select Create requests. Ochema creates the requests the driver type needs: one motor vehicle record (MVR) per state where the candidate held a license in the last 3 years, taken from the full application, plus the PSP report (when it is turned on), the medical exam and the road test. For this CDL driver, the list also has the Clearinghouse full query and the Pre-employment drug test.
-
On the page of the candidate, select the Offer tab, then Hire. The dialog shows the details that go to People > Directory, taken from the candidate. Choose the Person type, for example CDL driver, and, if you know them, the Terminal and the Start date. Select Hire.
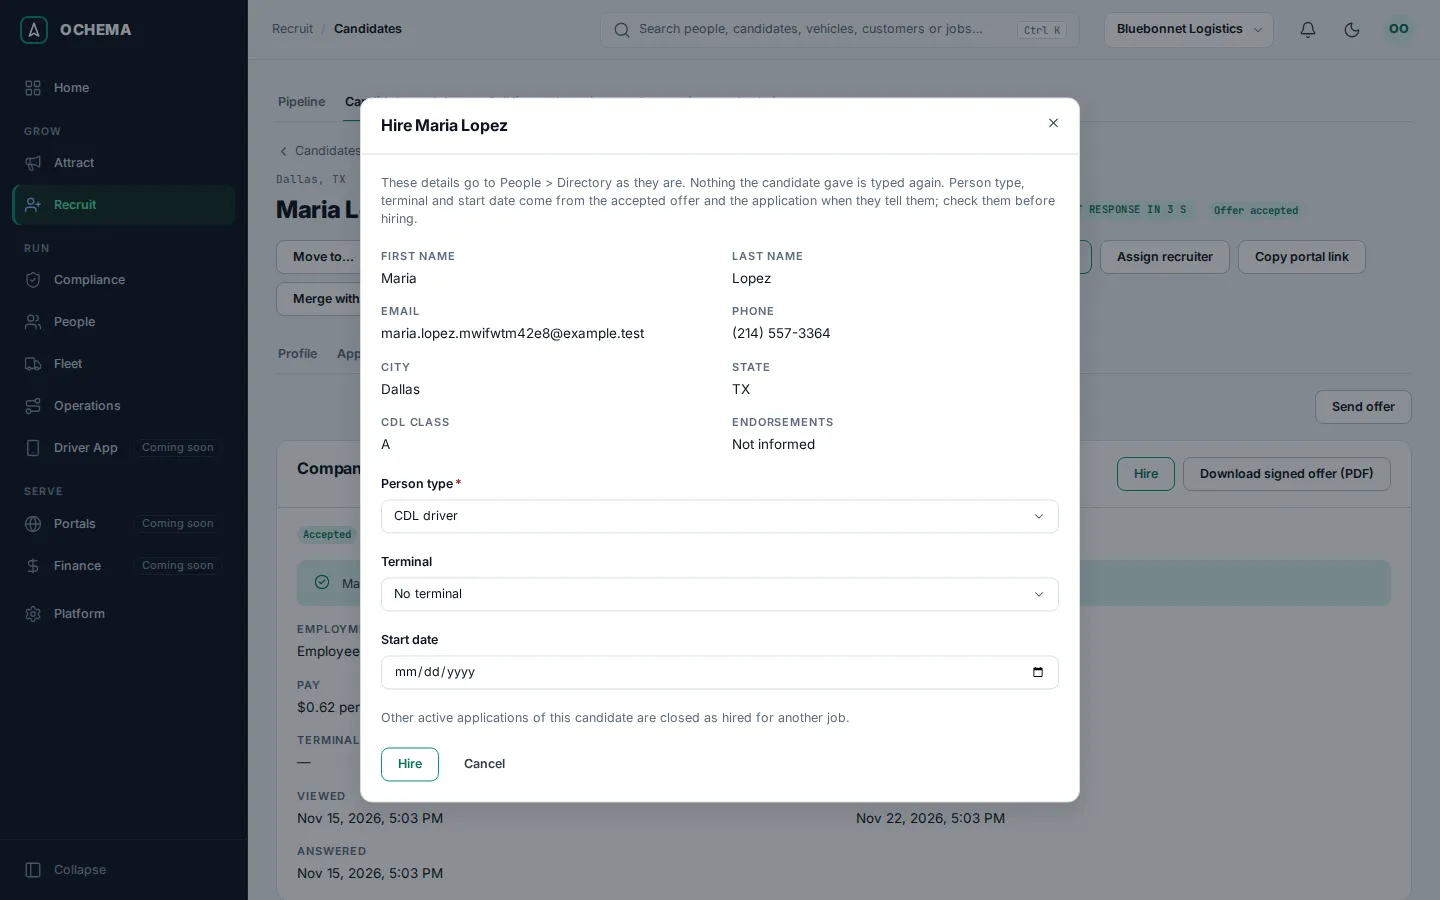
The message says the candidate was hired and added to People > Directory, and you stay on the page of the candidate. Ochema creates the driver file of the new driver: you find it in Compliance > Driver files (section 14).
12. Work each screening request
Section titled “12. Work each screening request”Compliance > Screenings lists the requests, with their status, for example To request. Search for the last name of the driver.
Open the screenshot at full size in a new tab: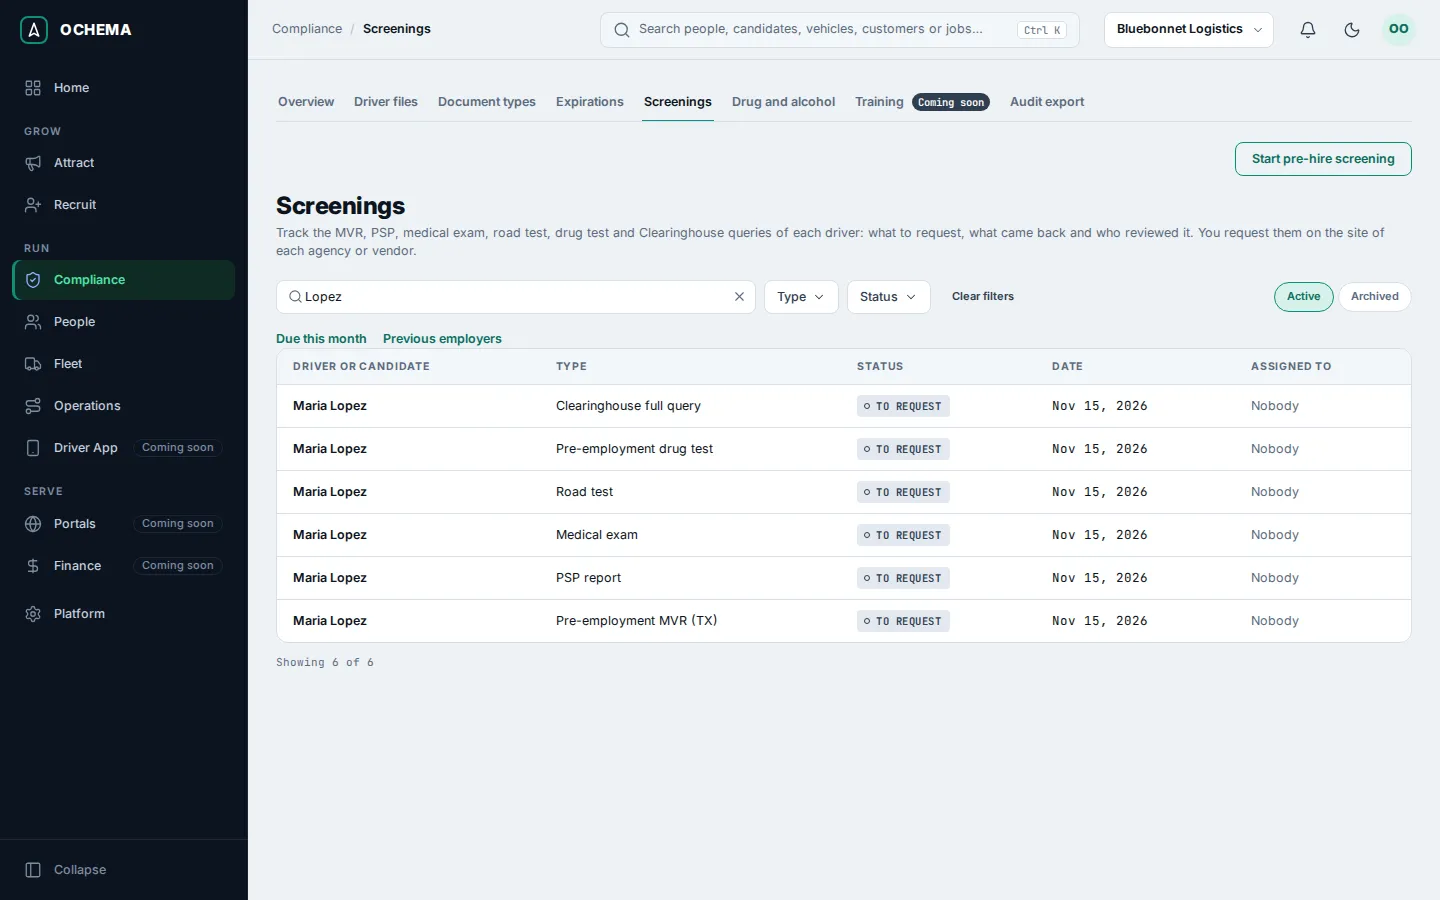
For the Pre-employment MVR, the PSP report, the Medical exam and the Road test, do the same three things. Select the request to open its page, then:
- Request it from the agency or provider. Type Requested on and Requested via, and select Mark as requested.
- When the result arrives, under Attach result, choose the File received (PDF, JPEG, PNG, WebP or DOCX, up to 25 MB), type Received on and select Attach.
- Under Review, choose the Result, Meets the requirements or Does not meet the requirements, type a Review note and select Save review.
The page then shows Reviewed, the result, who reviewed it and the item of the driver file it filled, for example Pre-employment MVR (TX): Valid.
Open the screenshot at full size in a new tab: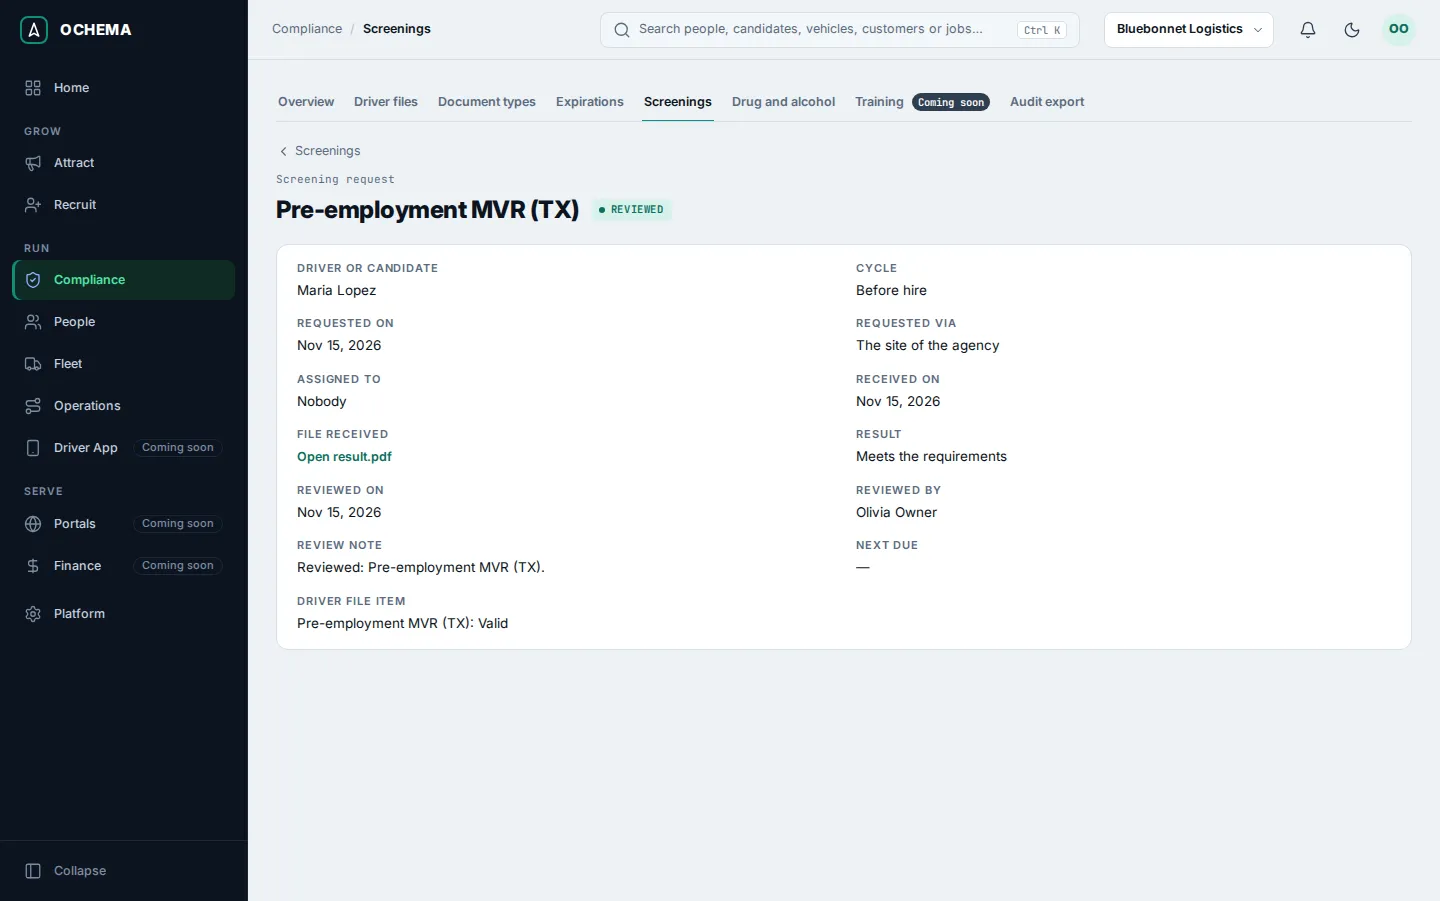
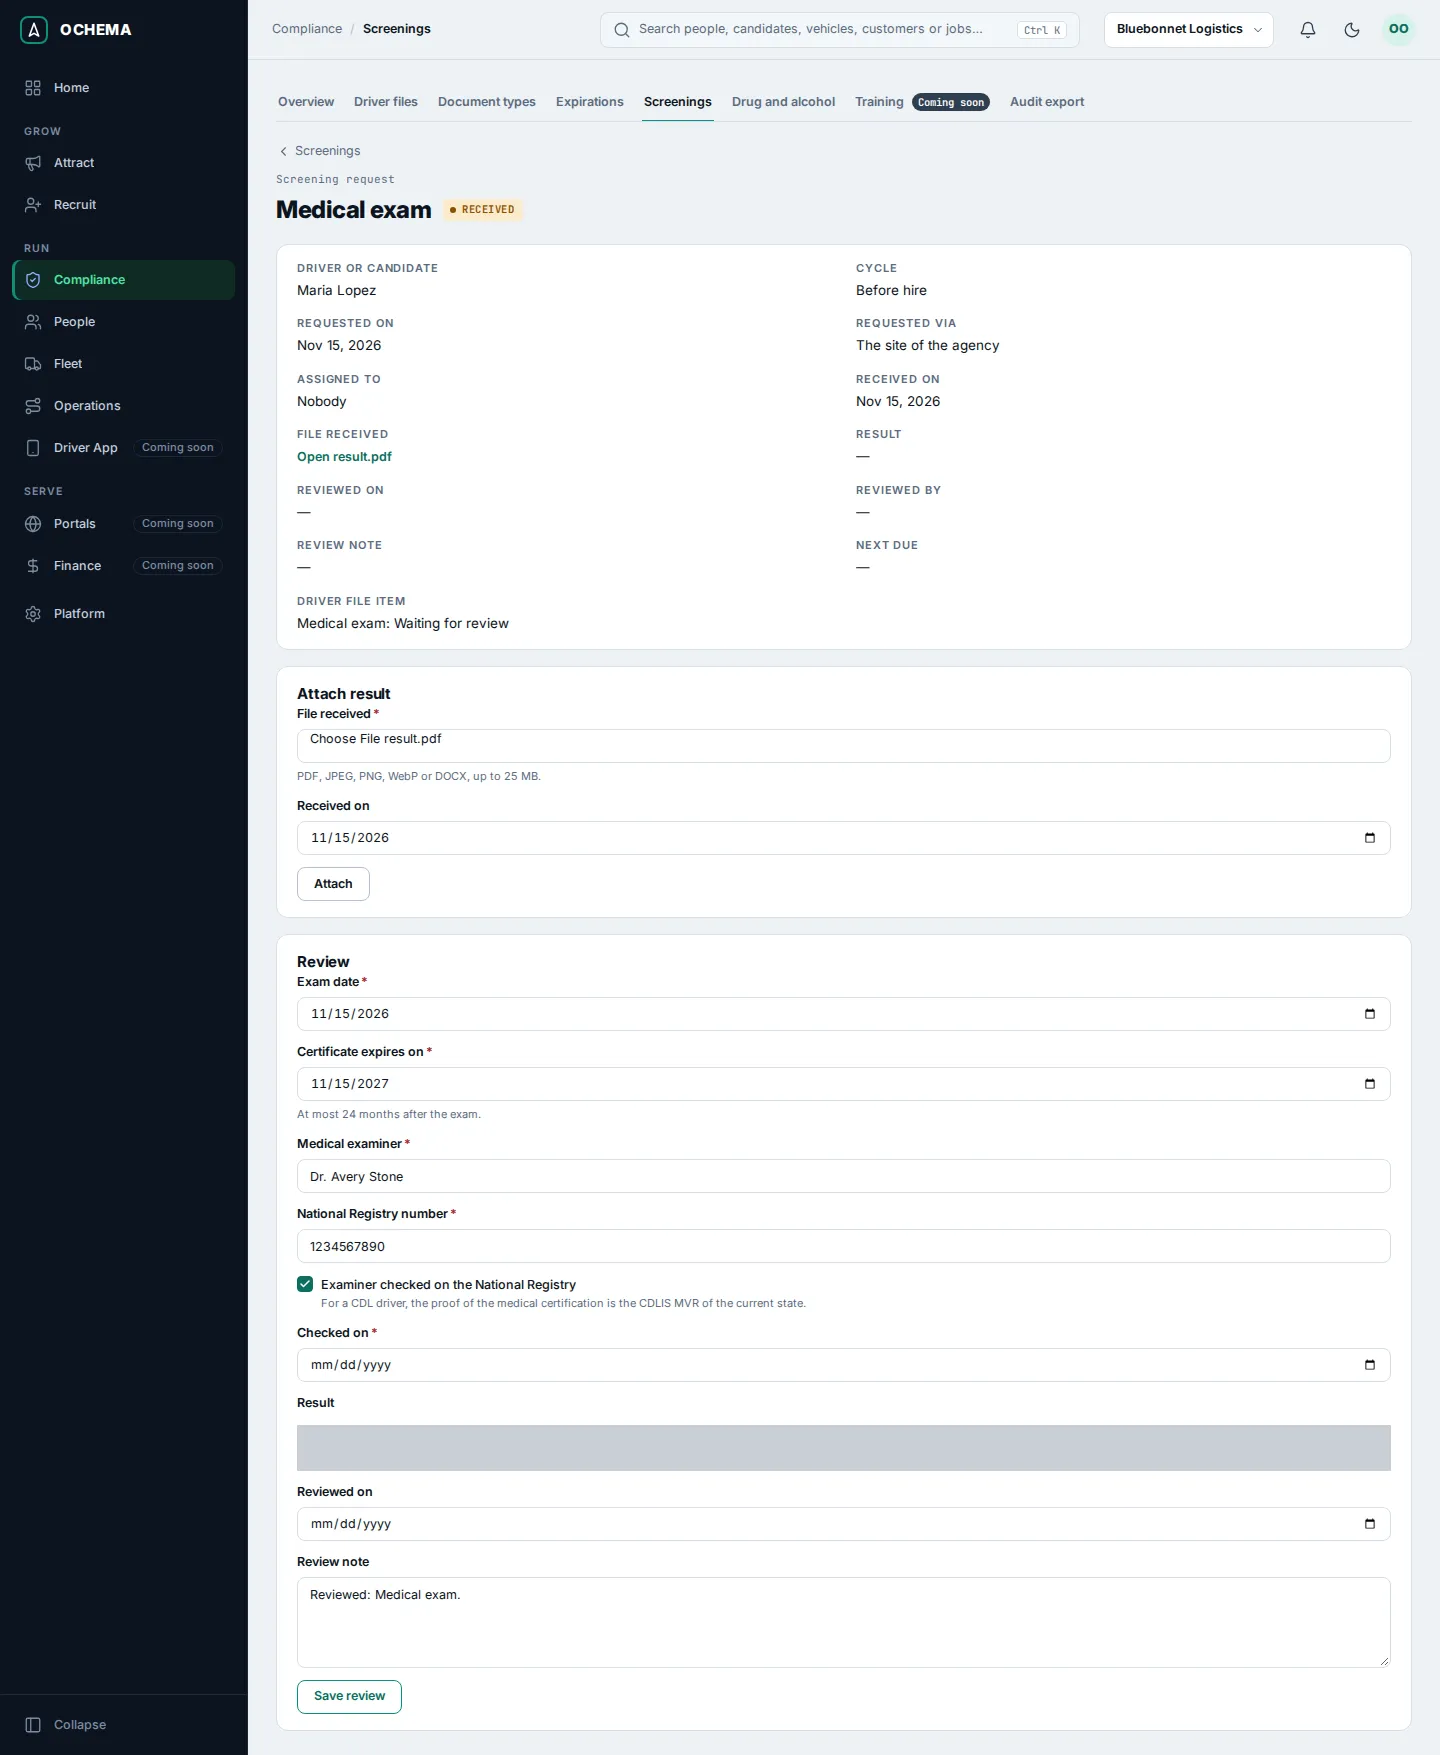
Two requests ask for more in the review:
-
Medical exam: the Exam date, Certificate expires on (at most 24 months after the exam), the Medical examiner, the National Registry number and Examiner checked on the National Registry.
-
Road test: under Accepted equivalent, choose Valid CDL when the valid CDL of the driver is accepted in place of the road test, or Road test certificate of a prior employer.
13. Record the drug and alcohol results
Section titled “13. Record the drug and alcohol results”The Clearinghouse query and the pre-employment drug test are kept in the drug and alcohol file, apart from the rest of the driver file.
-
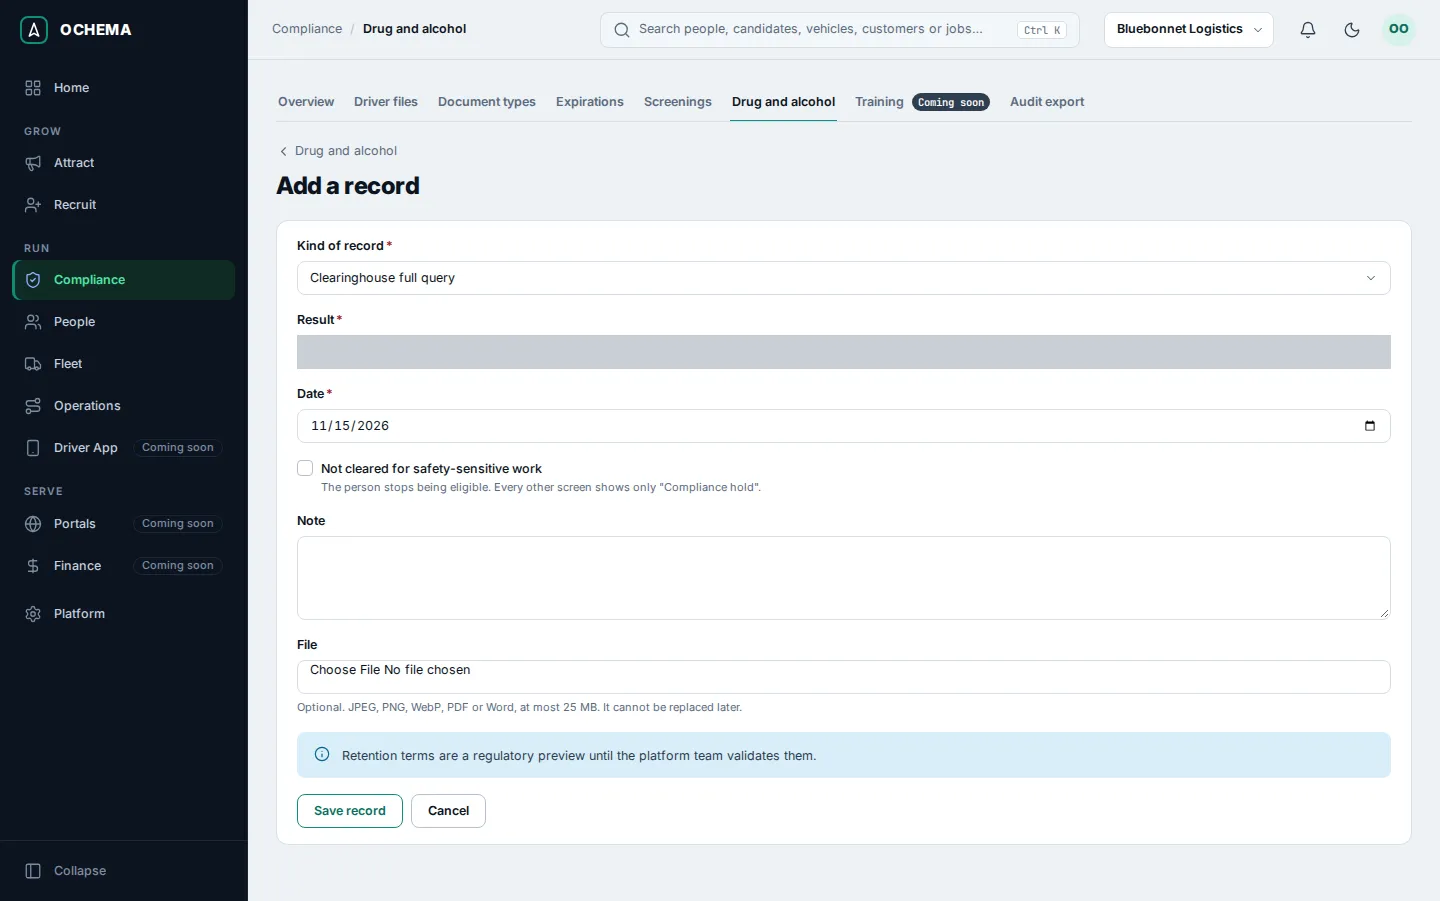
Open the request Clearinghouse full query and select Record the result in Drug and alcohol. The page Add a record opens for the driver.
-
Choose the Kind of record Clearinghouse full query, the Result (for example Not prohibited) and the Date. Optional: a Note and a File. Select Save record.
-
Open Compliance, then Drug and alcohol, and select Add record. Search for the driver by name and choose the driver in Person or candidate. Choose the Kind of record Pre-employment test, the Result (for example Negative) and the Date. Select Save record.
14. Approve the license on the driver file
Section titled “14. Approve the license on the driver file”The photos of the license the applicant sent with the full application wait for review on the driver file.
-
Open Compliance, then Driver files, search for the driver and select the name.
-
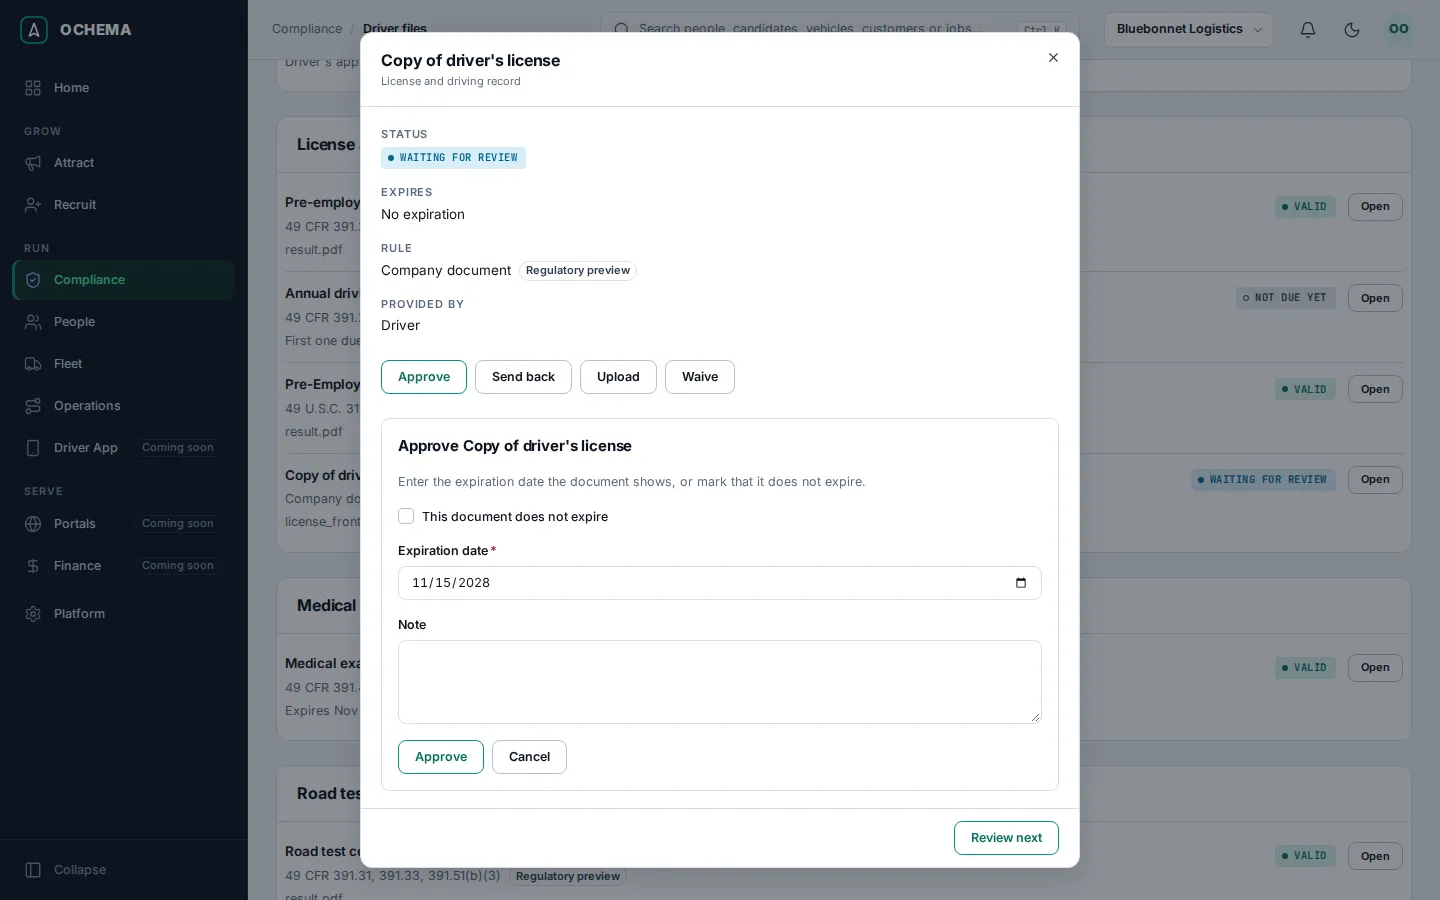
Under License and driving record, select Open on Copy of driver’s license. The panel shows the status Waiting for review and the files the driver sent.
-
Select Approve. The form Approve Copy of driver’s license opens with This document does not expire checked, and no date field. Uncheck it: Expiration date appears. Type the date the license shows and select Approve. The Status changes to Valid. Close the panel.
The driver file shows Eligible to drive, with the count of items still missing or waiting for review and the next expiration. Each item shows its rule and its status: Valid, Missing, Waiting for review or Not due yet. In this example, items such as the safety performance history from previous employers still show Missing with their due date, and the driver is eligible: work them before that date.
The copy of the driver’s license is a company document, not one of the items marked Required to drive: the driver file may already show Eligible to drive before you approve it. Approving it keeps the copy of the license, with its expiration, in the driver file.
Open the screenshot at full size in a new tab: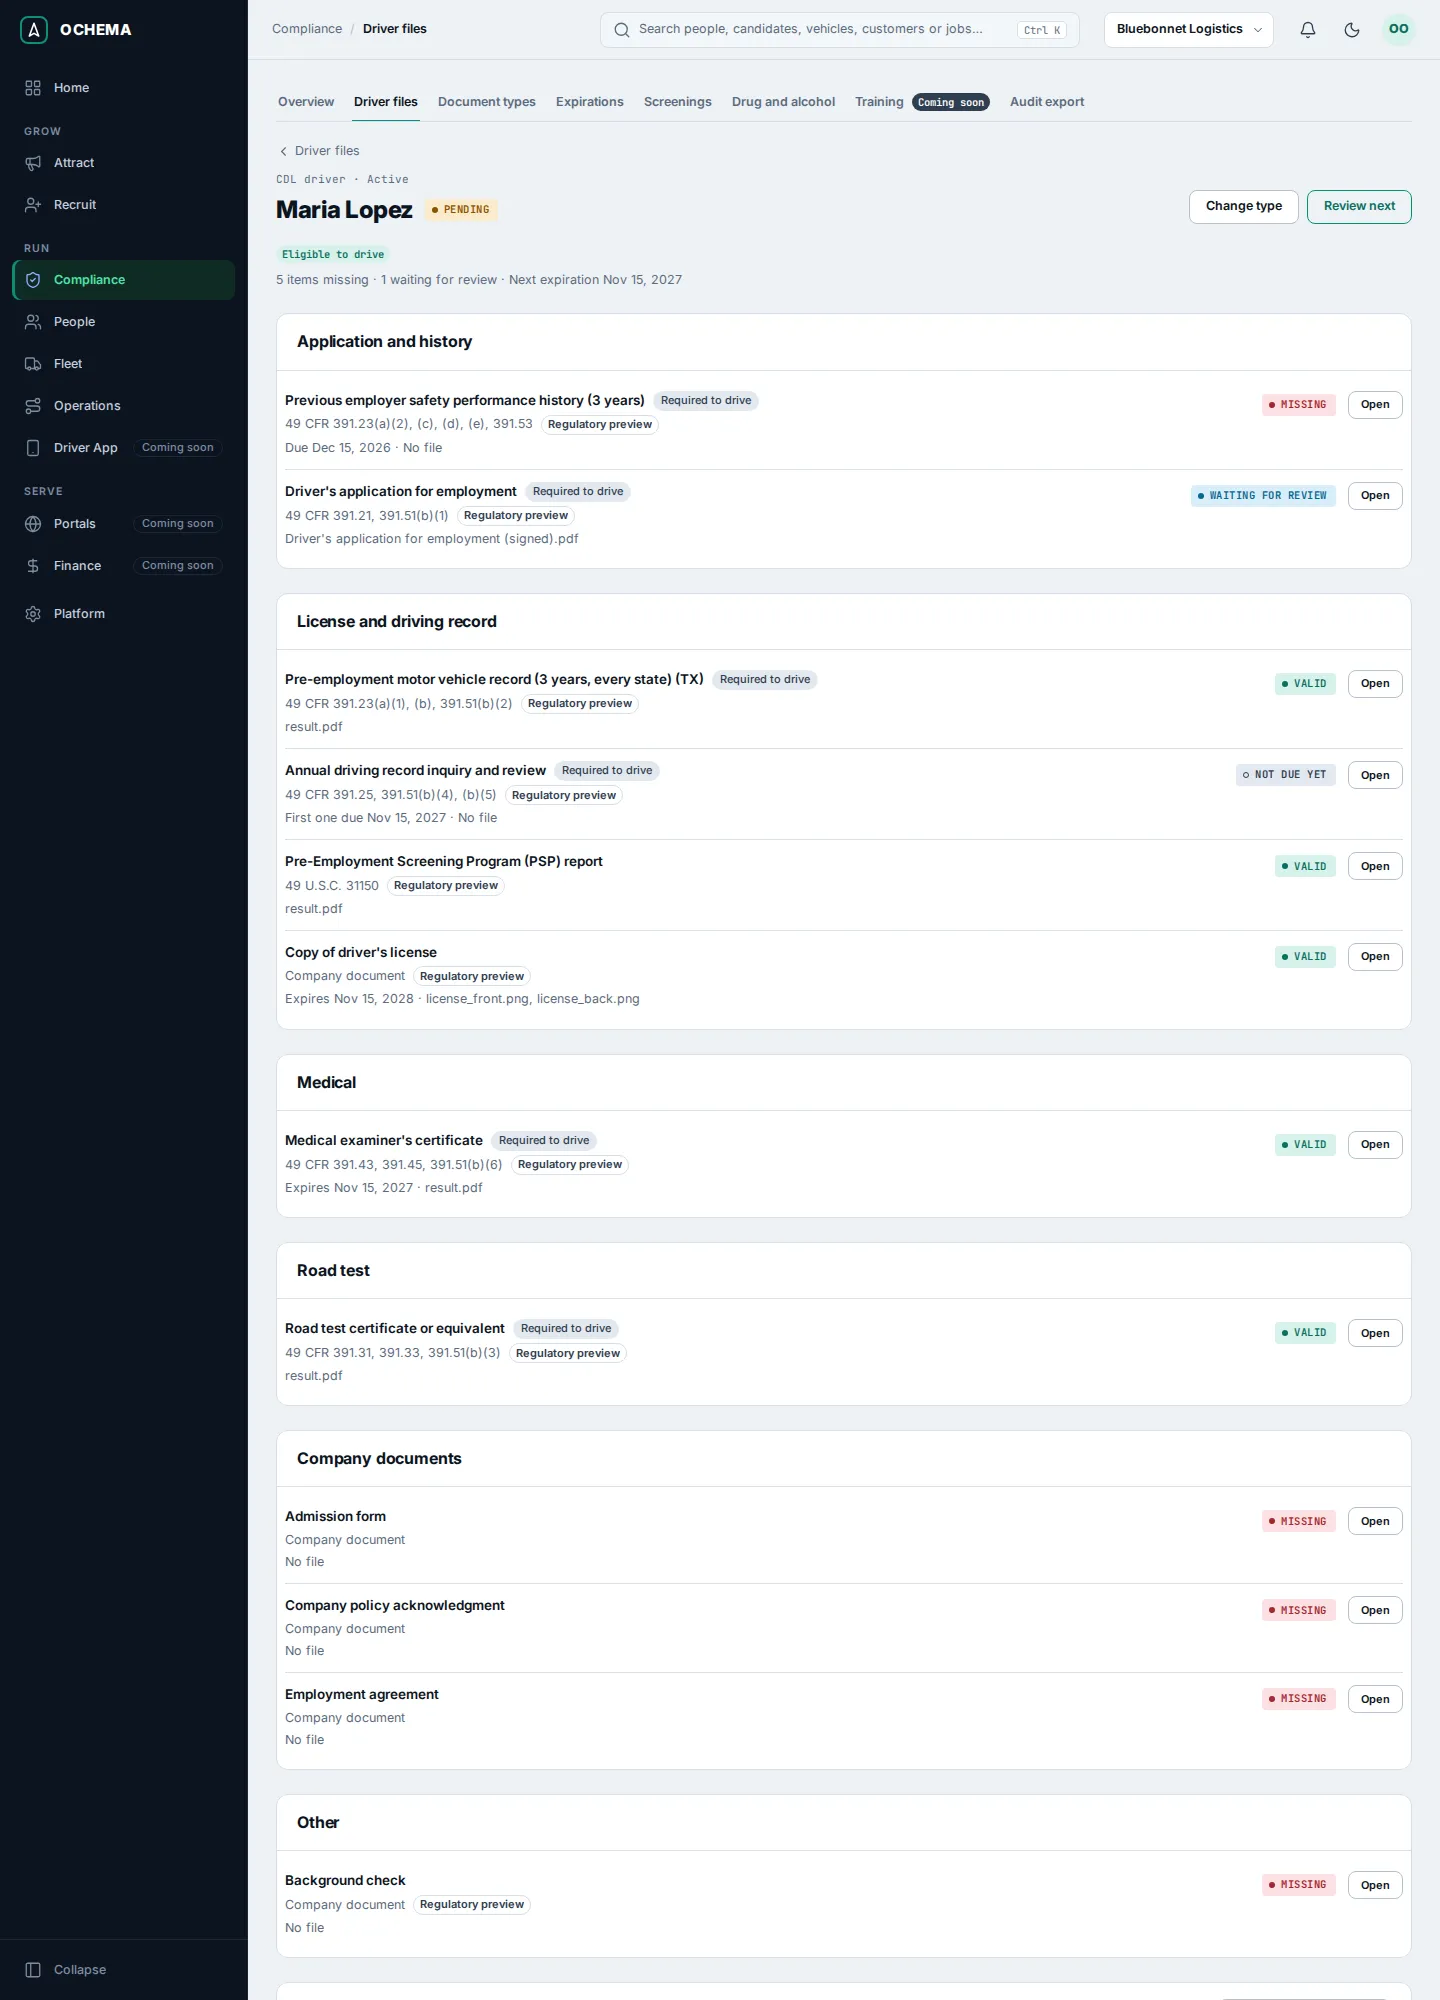
15. Export the driver file for an audit
Section titled “15. Export the driver file for an audit”- Open Compliance, then Audit export.
- In What to export, choose One driver, then choose the Driver.
- Optional: check Include previous versions, or Show full identifiers to show the Social Security number, date of birth and license number in full. Each value shown in full is recorded in the audit log.
- Select Generate export. The message Export started. It is generated in the background. appears.
- Reload the page after a moment. Under Exports, the row shows Ready. Select Download to save the PDF. Each file can be downloaded for 7 days.
Open the screenshot at full size in a new tab: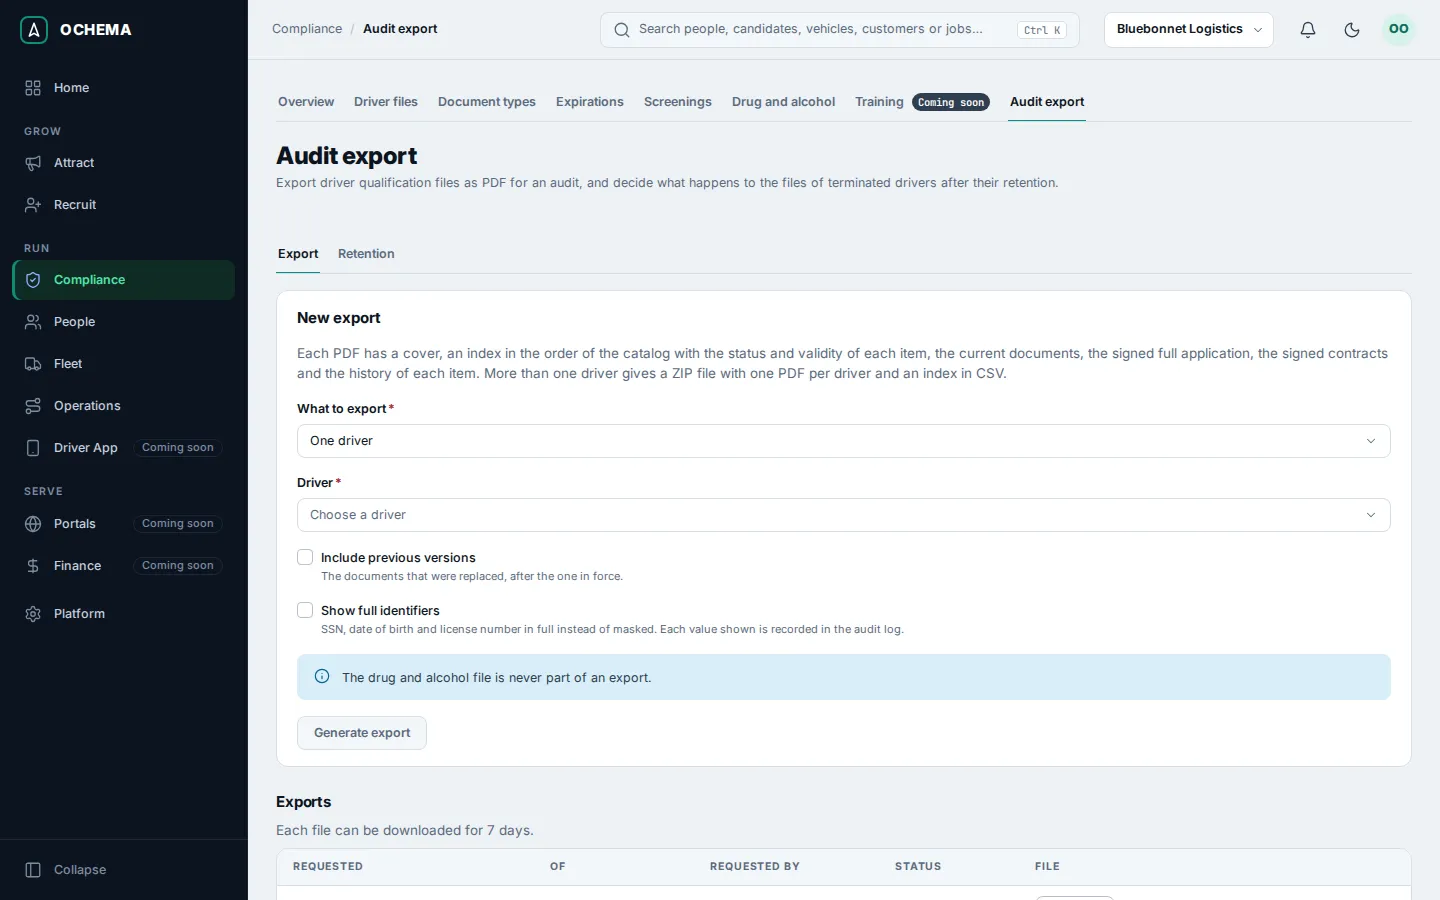
The PDF has a cover, an index of the items with their status and validity, the current documents, the signed full application, the signed contracts and the history of each item. The drug and alcohol file is never part of an export.
What you did
Section titled “What you did”You took one applicant from the careers page to an eligible driver, with every document of the driver file kept in Ochema, and exported the file for an audit.